With the SunPower bankruptcy and many users being left with no great support options (unless they pay a subscription), I am getting more and more people landing and commenting on my earlier SunPower PVS6 posts. So, I’m providing an update for what I recommend today, and I am including some (maybe a little janky) pages for self monitoring.
Disable SunPower / SunStrong Access
The first thing I am going to suggest, disconnect your PVS6 from your Internet, either by disabling the wifi in the app or, even better, block it with a firewall rule. Why? Well, the only changes SunStrong seems to be making is locking owners out of their PVS6 and adding subscription options to get to your data. So while you can still get access to your PVS6 today, that could change if they do future updates to block you. So, block them. Yeah, you won’t have access to “most recent power” in the SunStrong app but that isn’t too useful anyway and everything else seems to be an upsell.
Take Control
The next thing you need is local access to your PVS6. I documented some of this in Very Basic SunPower and Home Assistant, no HACS, but the basic idea is there is an Internet port in your PVS6 and you need to connect it to your home network. I provided one solution, but there are many ways to go about it.
Once you have access, you can easily hook up your internal home management systems, like Home Assistant with the hass-sunpower integration (both free).
A Free, No Server Monitoring Solution
I built a very basic monitoring webpage that you can run from your computer, no server needed. And by “built”, it was pure vibe coding – don’t install it on a publicly accessible server as, like fruitcake, I’m not 100% sure what’s in it.
SunPower PVS6 Monitoring App, almost night time
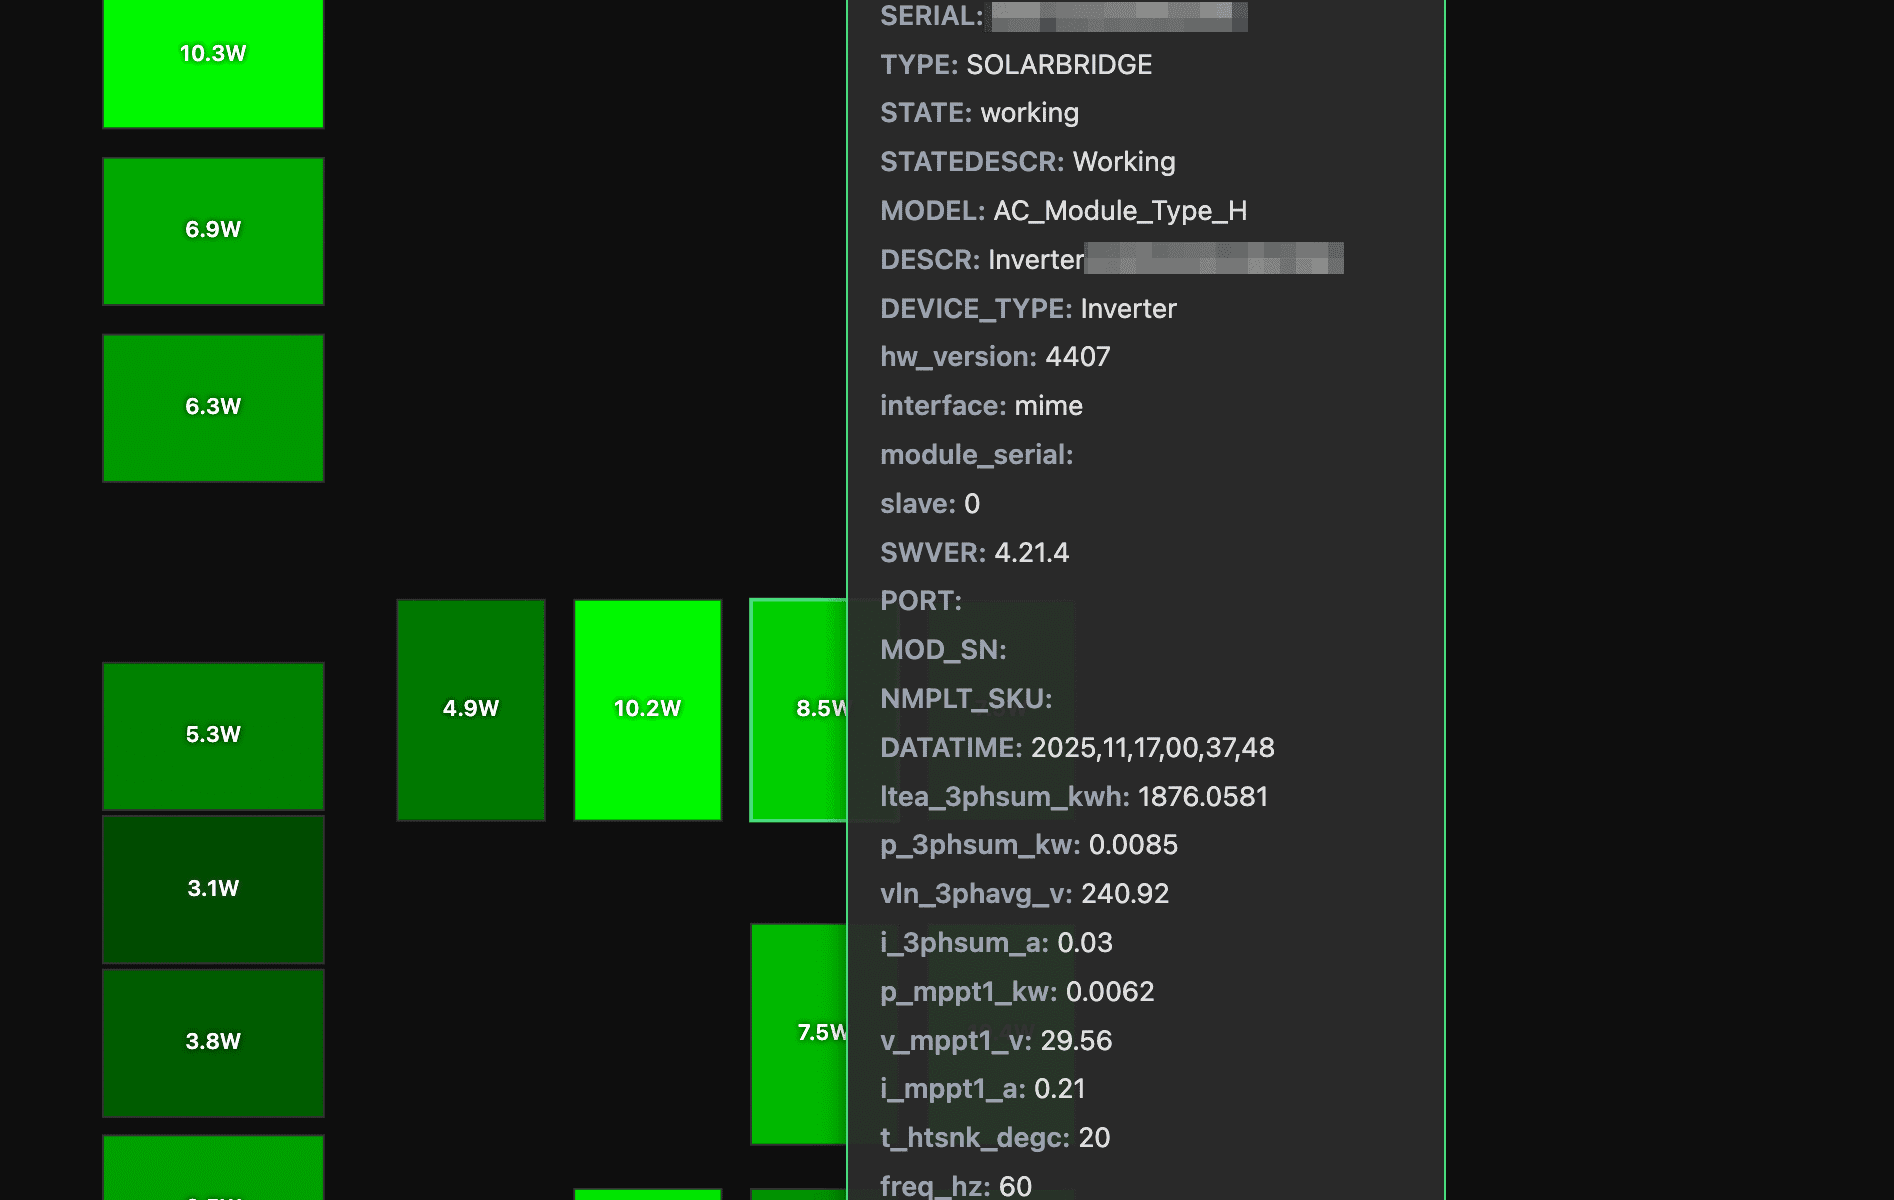
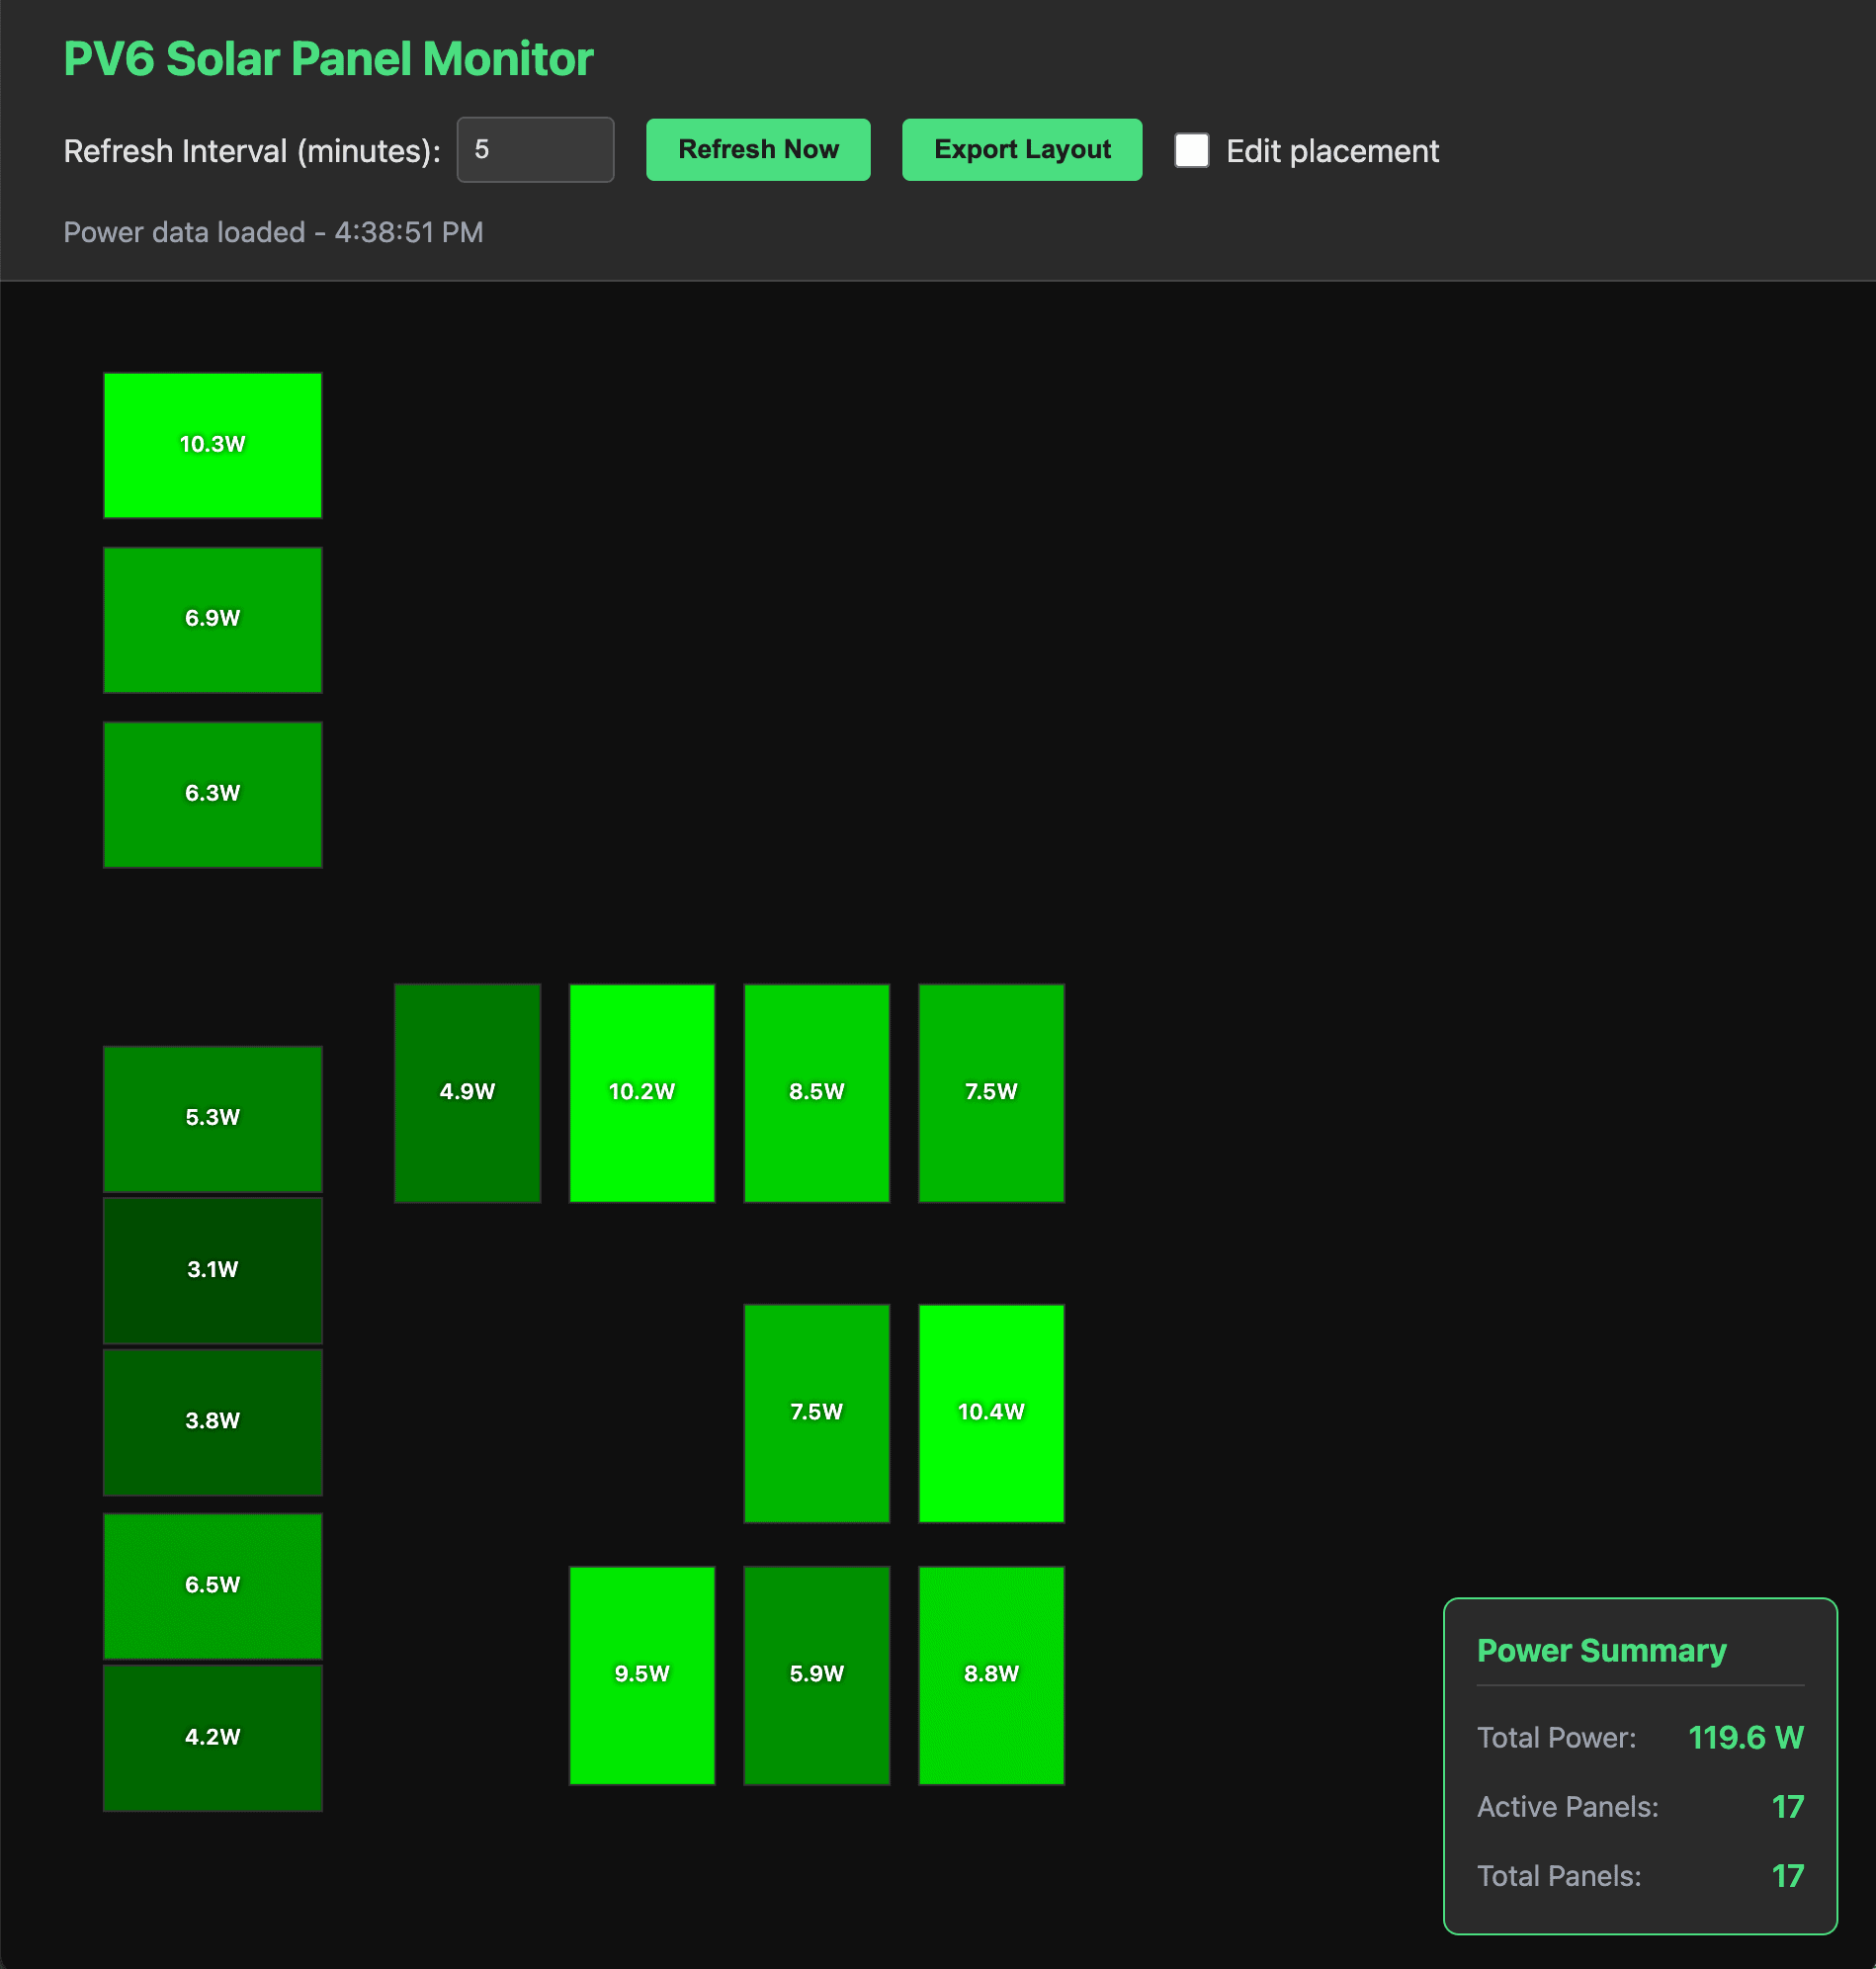
The basic functionality is pretty simple… set a config file to your PVS6 and it will read your panel information (including physical locations – who knew those were in the PVS6 settings?) and then show you the real-time power generation of each panel. And if you want to dig in deeper, all of the panel information can be examined with a simple mouse over. Each panel is shown brighter based on the power it is generating.
If the panel layout isn’t what you expect you can also drag the panels to your preferred locations. That said, the layout for my house just… sort of worked. Your milage may vary.
Oh, since the panel locations don’t change, you can export your layout and speed up access every time you load the web page (yes, do this).
How do you use it? Download from GitHub and just click on the index.html file (well, look at the README.md file to configure it to point to your PVS6 first).
SunPower PVS6 Detailed panel view (again, almost night time)
I’ve tested this on all of one system – mine. So I am sure there are many edge cases that don’t work, but I’m happy to work through some bugs / enhancements as I get some time.
Did you try it? Love it? Hate it? Want a feature or bug fix? Please leave a comment, below!
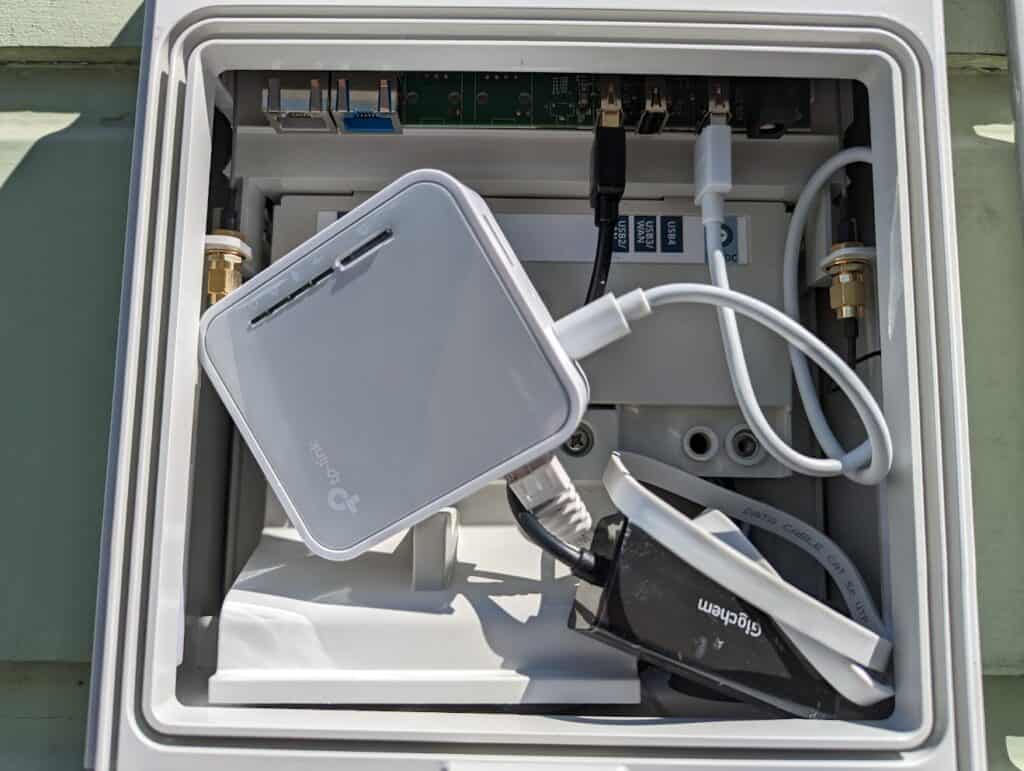
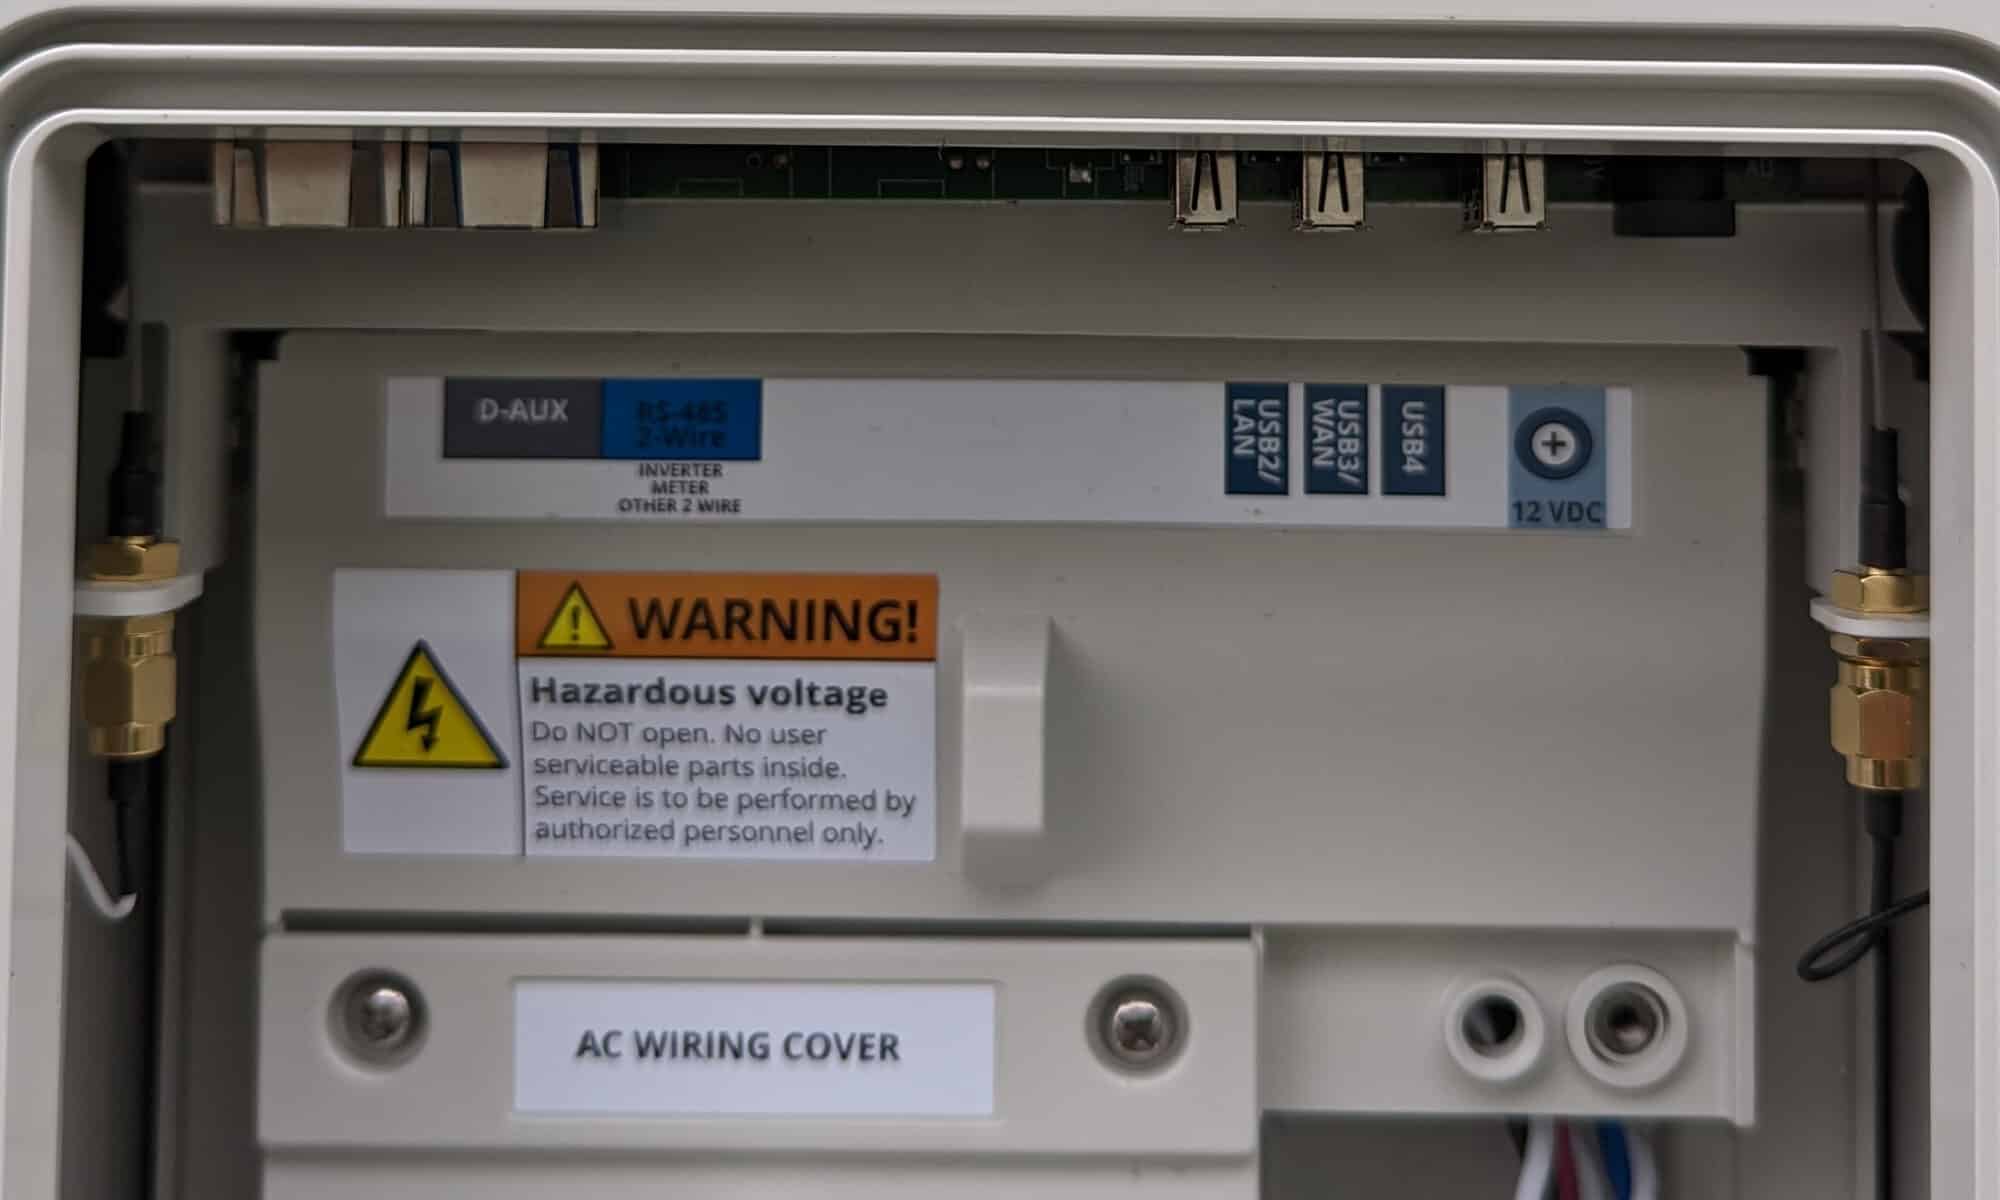
The first thing was getting the SunPower PVS6 administrative interface. Since I didn’t have easy cabling access, I used a $7 ethernet adapter and a TP-Link AC750 Wireless Portable Nano Travel Router (TL-WR902AC). There is a cheaper model of the TP-Link that would have worked just fine, but even at $39 it was less expensive than most of the lowest-end Raspberry Pi crazy-ass prices right now. Power for the TP-Link comes from the LAN4 port on the PVS6, and the ethernet connects to USB2/LAN. The TP-Link is configured in “Router Mode”, where it connects by wired ethernet to the PVS6 and creates a separate network for all devices that connect by wifi. If you do this, you will want to configure the TP-Link to use a network different than your home network (e.g. if your home network is 192.168.0.0/24, use something like 192.168.2.0/24).
TP-Link and ethernet dongle crammed in the SunPower PVS6
At this point you should be able to connect to the TP-Link wifi and test access to the administrative interface at http://172.27.152.1.
Of course, the problem now is we need to connect the home network to the SunPower network, but there is some nuance… we only want the web traffic. Very specifically, we do not want the TP-Link to connect to the network and start giving new IP addresses to our home network, which is also why you don’t just plug the ethernet from the PVS6 into your home network.
I happen to have a home file / everything else server that runs on a Raspberry Pi, and already has Apache running. That server connects to my home network via an ethernet cable, so its wifi was unused and available. I connected to the SunPower wifi (SSID “sunpowernet”):
sudo nmcli d wifi connect sunpowernet password "5ekr1tp@$$"
Finally, I need to let the server know that when the destination network is the PVS6, it needs to use the wifi connection, not the ethernet connection:
sudo ip route add 172.27.152.0/24 via 192.168.2.1
This is a great time to mention that it would be good hygiene to setup your server to have firewall rules blocking incoming traffic from the TP-Link, other than DHCP and established connections, in case the PVS6 is ever compromised.
Reverse Proxy
While HAProxy is super awesome and you should absolutely use it if starting from scratch, I happen to have a home server that gets 5 requests per month and was already running Apache, so I wanted to do as little extra work as possible. Fortunately, Apache has a reverse proxy, and that makes this pretty easy. I setup a virtual host with the following sunpowerproxy.conf config:
The virtual server is going to expect the HTTP request to come to a server named “sunpowerproxy” (or whatever you name it), so you’ll need to add that DNS entry pointing to the ethernet address, not the wifi address.
After a few seconds you should get a JSON blob listing all of your devices.
Home Assistant Configuration
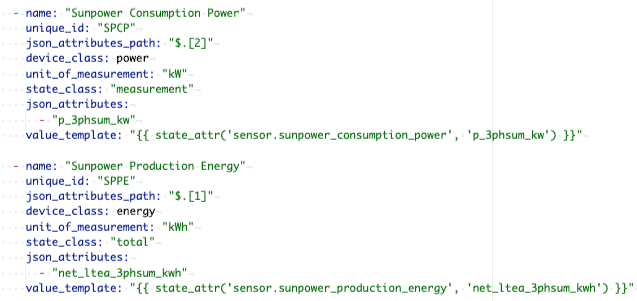
Finally, we need Home Assistant to be able to pull the values from the proxy. The RESTful integration provides a pretty easy way to do this… here is a basic configuration to get the current power usage and overall energy, although a lot more information, including details for each individual panel, is available:
Now you should have the ability to add the SunPower sensors, and configure the Energy dashboard!
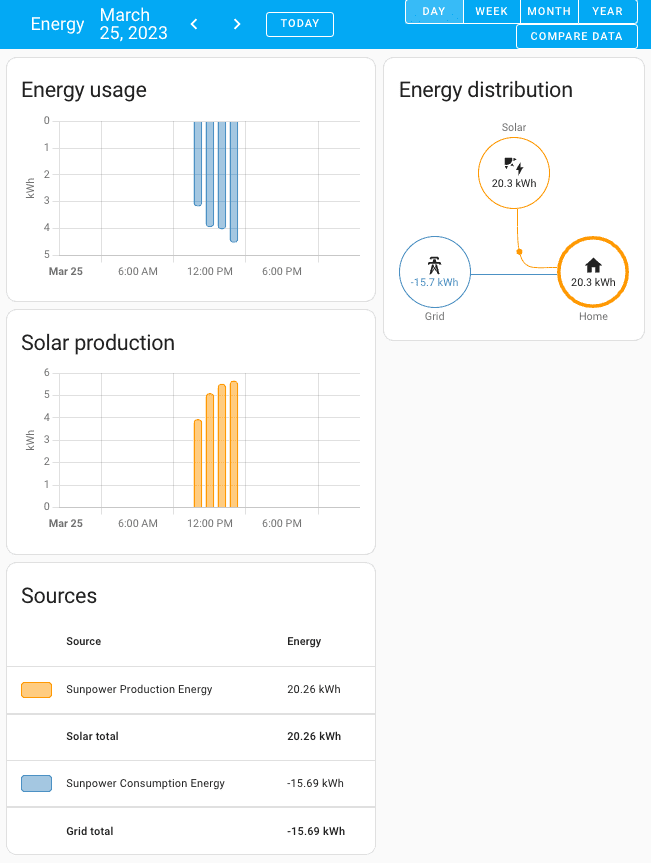
The Energy dashboard in Home Assistant
Now that I have this working I will probably realize that the hass-sunpower using HACS is a way better solution, but only the RESTful integration would need to change, all of the network and proxy configuration would carry over.
Finally, if you’ve made it this far, you probably realize that it would be way better if SunPower offered a reasonable API for home integrations, instead of making people take these ridiculous steps… please let your SunPower contact know!
What’s your SunPower and Home Assistant experience? If you’re following in my footsteps (yikes), how did it go?… please leave a comment, below!
Update November, 2025: see my most recent post on self-hosting PV6, which has my latest recommendations following the SunPower bankruptcy.
Well, if you landed on this post you either have a need to cure your insomnia or you have a very specific problem. I recently decided to become a sun farmer, and went with SunPower, which is great, but they don’t offer integrations beyond their decent but limited web and mobile apps. In particular, I wanted to integrate with Home Assistant, because… well, just because.
The main solar interface from SunPower is the PVS6 (successor to the PVS5), and by connecting to an administrative interface it is possible to pull some detailed data like specific energy output and health for each panel. The good news is the PVS6 comes with two ethernet ports, one for a WAN to connect to their servers and one for a LAN that will allow access to the administrative UI, and all one needs to do is connect to said port and then… hey, WTF? My PVS6 doesn’t have either of these ethernet ports! So, yeah… evidently there is a new version of the PVS6 that does not have ethernet ports, and the primary WAN connection is via wifi.
A blurry photo of the ethernet-port-less SPV6
After digging around teh webz, it seems that the PVS6 USB ports will work with a USB to ethernet adapter, but several people reported some adapters didn’t work. Unsure if the magical solution is the adapter needs to be USB 2.0, but I found a $7 adapter on Amazon, and it just worked. I connected my laptop to the USB2/LAN port, the PVS6 assigned an address to my laptop, and browsing to http://sunpowerconsole.com/ provided a web administration interface. However, PVS6 is not within convenient ethernet wiring distance, so I dug around some more and found Dolf Starreveld’s page, which included an amazingly comprehensive doc, Monitoring a solar installation by tapping into a SunPower PVS5 or PVS6. This doc starts with the assumption you have a PSV* with an ethernet connection and want to get to wifi, and with my USB to ethernet dongle, that’s what I had, so all I needed to do was mount a Raspberry Pi in the PSV6 to act as a router / bridge to my network. But while reading his doc, I noticed a mention of a hotspot interface available for a limited time after PVS6 power-up, and a link to a SunPower doc on commissioning the PVS6 via wifi… this sounded promising.
Sure enough when I scanned for wifi connections, I found a SunPower SSID that matched my system. And since my system had been on for days, it didn’t appear that the 4-hour window applied, so great news! The formula for the SSID is “SunPower” immediately followed by characters five and six of the PVS6 serial number; immediately followed by the last three digits. The password follows a similar formula, characters three through six of the PVS6 serial number; immediately followed by the last four digits. Once connected, I had the exact same access I had when directly connected via ethernet.
But the cool stuff isn’t really in the web UI, you need to call it directly. For example:
Will show all devices and panels, with a ton of data on each. Dolf Starreveld’s document has a ton of details.
Since I don’t plan to run this from my laptop, I still need to bridge the network… several people have written about using a dedicated device like a Raspberry Pi, including Scott Gruby’s Monitoring a SunPower Solar System, where he uses a very lightweight Raspberry Pi Zero W, and then a simple haproxy setup. However, I’d like to avoid another device (especially with the current price for Raspberry devices – holy crap), and my Raspberry Pi 4 file server connects via ethernet, so I’ll likely use its wifi to connect to the PSV6 and run the proxy from there. After that I’ll configure Home Assistant and likely bore you with another posting.
And, no sooner do I get to the end of writing a post when I realize that the wifi network has vanished, so I either need to find a way around that problem or else I’m adding a router to my PSV6.
Are you doing anything interesting and hacky with your SunPower system? Do you have cool integrations with Home Assistant? Did you stay awake through this whole post?… please leave a comment, below!