With the SunPower bankruptcy and many users being left with no great support options (unless they pay a subscription), I am getting more and more people landing and commenting on my earlier SunPower PVS6 posts. So, I’m providing an update for what I recommend today, and I am including some (maybe a little janky) pages for self monitoring.
Disable SunPower / SunStrong Access
The first thing I am going to suggest, disconnect your PVS6 from your Internet, either by disabling the wifi in the app or, even better, block it with a firewall rule. Why? Well, the only changes SunStrong seems to be making is locking owners out of their PVS6 and adding subscription options to get to your data. So while you can still get access to your PVS6 today, that could change if they do future updates to block you. So, block them. Yeah, you won’t have access to “most recent power” in the SunStrong app but that isn’t too useful anyway and everything else seems to be an upsell.
Take Control
The next thing you need is local access to your PVS6. I documented some of this in Very Basic SunPower and Home Assistant, no HACS, but the basic idea is there is an Internet port in your PVS6 and you need to connect it to your home network. I provided one solution, but there are many ways to go about it.
Once you have access, you can easily hook up your internal home management systems, like Home Assistant with the hass-sunpower integration (both free).
A Free, No Server Monitoring Solution
I built a very basic monitoring webpage that you can run from your computer, no server needed. And by “built”, it was pure vibe coding – don’t install it on a publicly accessible server as, like fruitcake, I’m not 100% sure what’s in it.
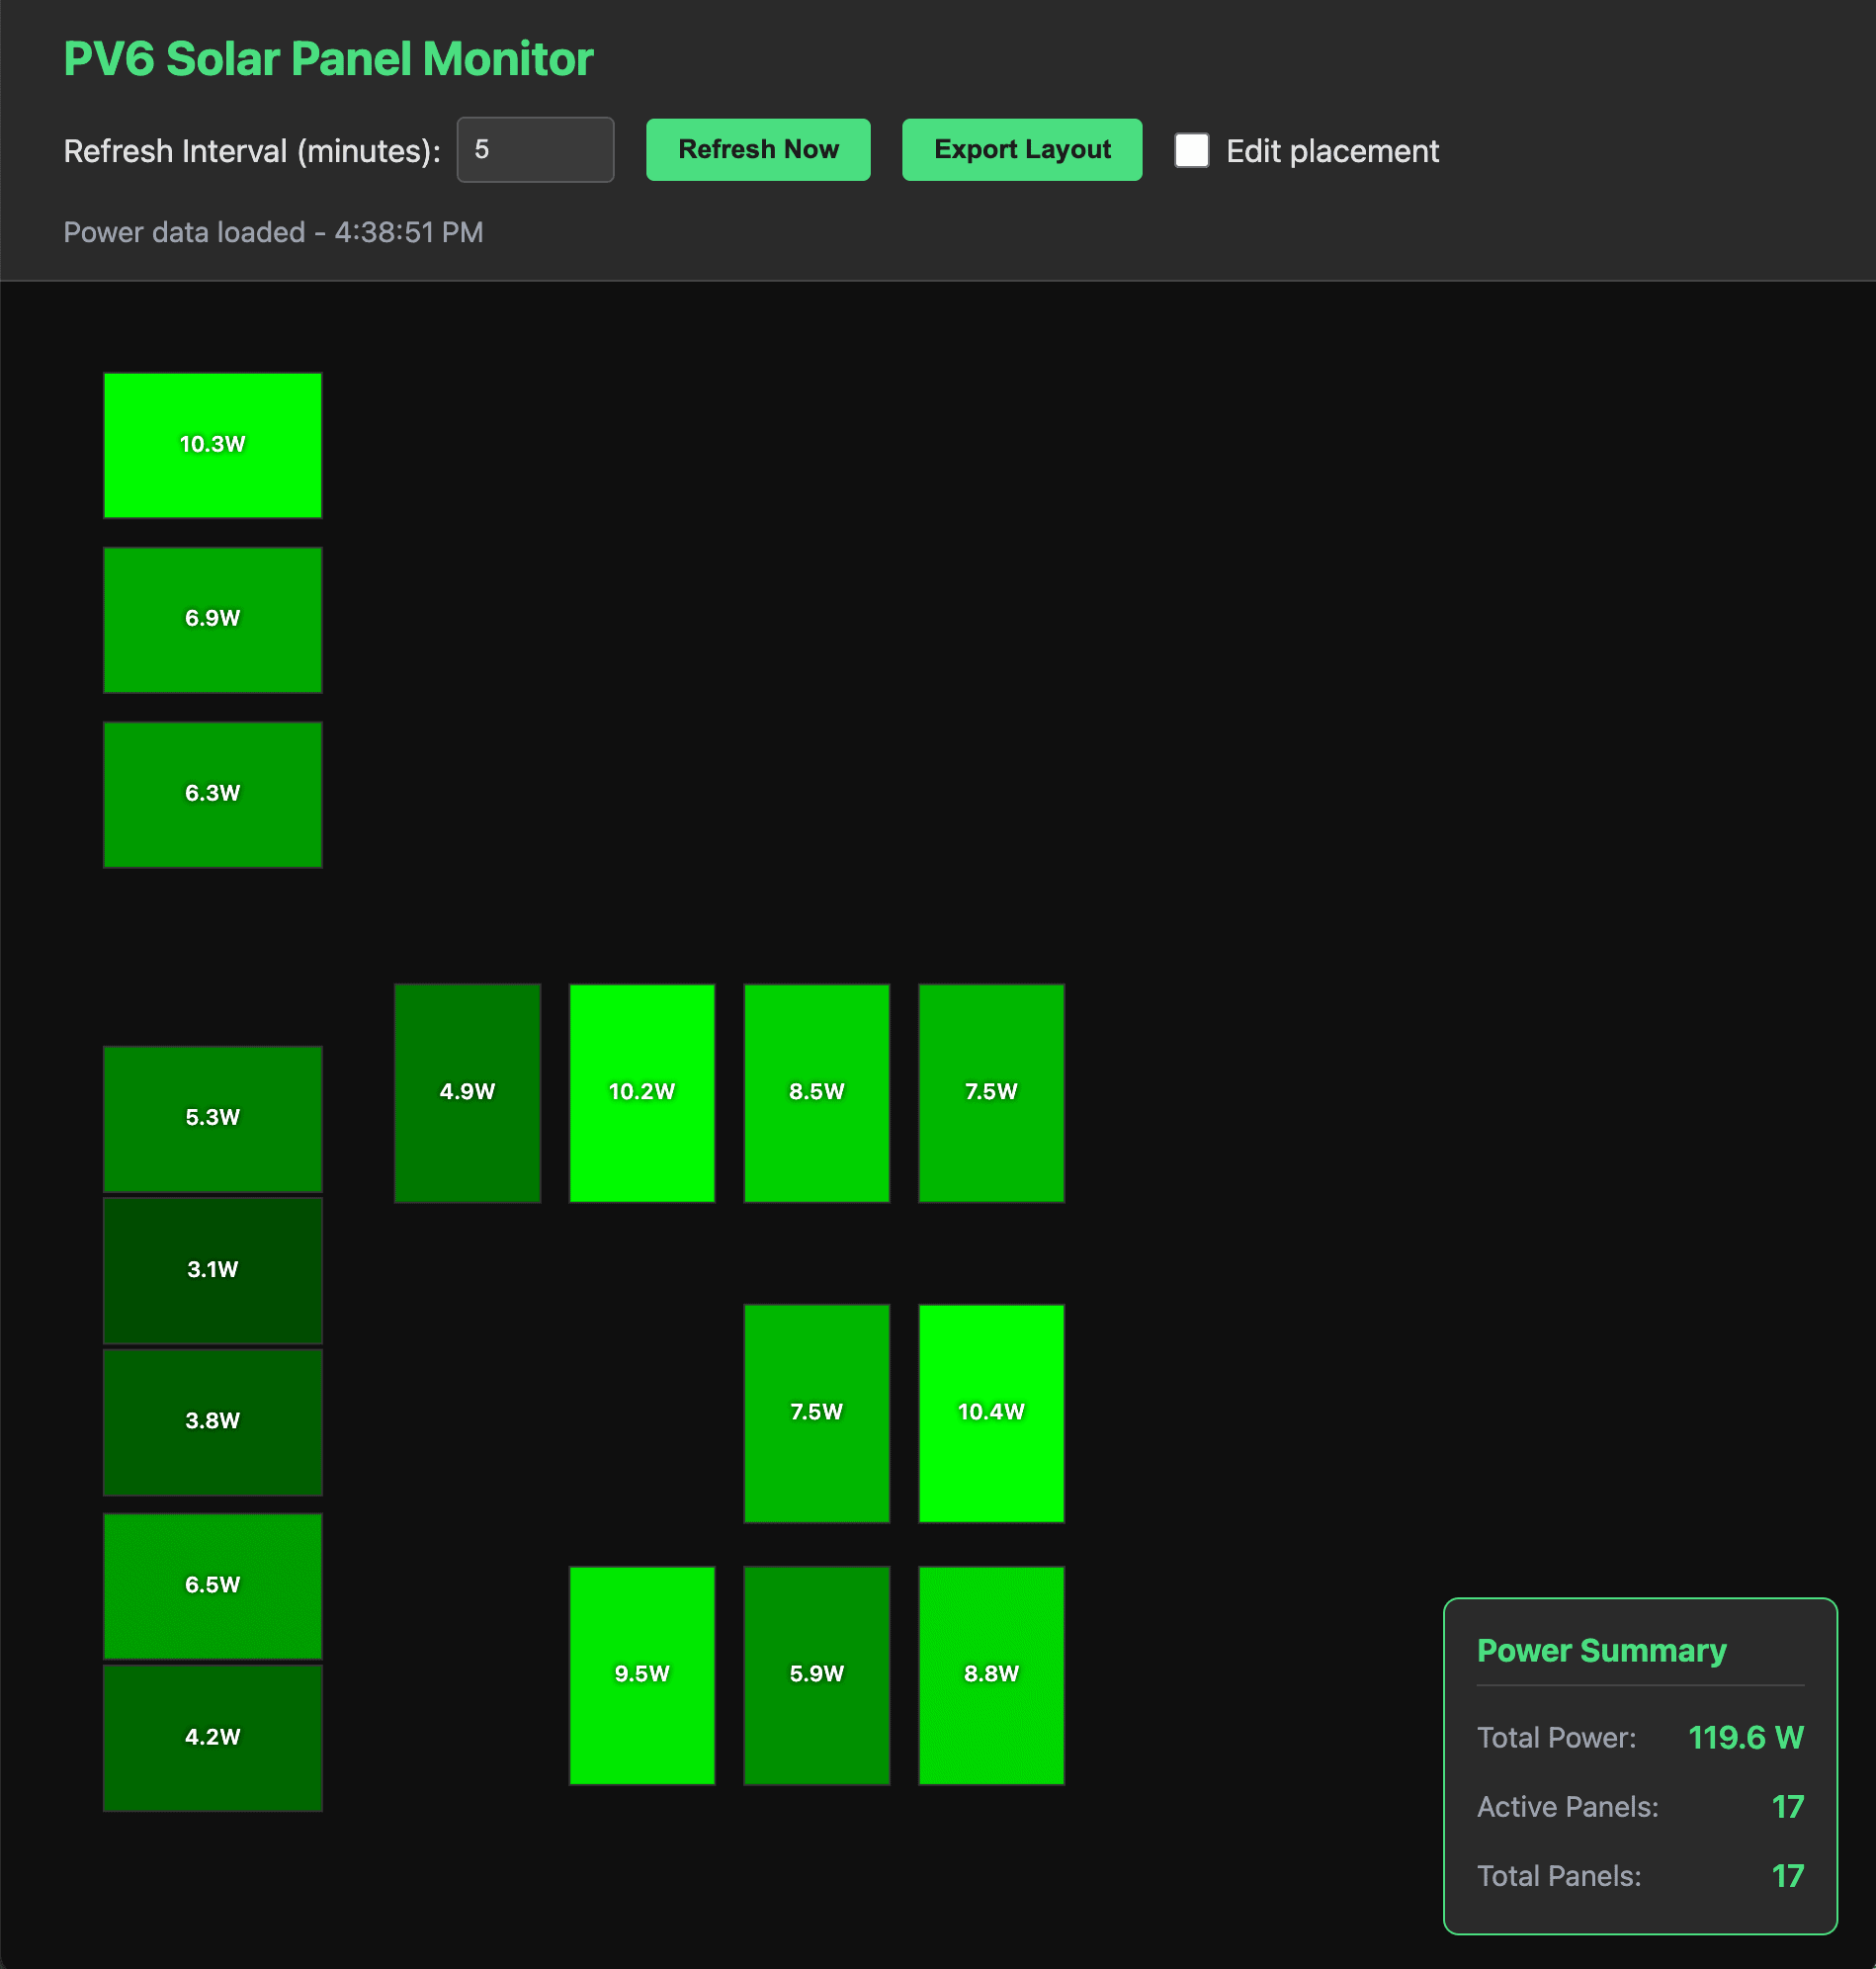
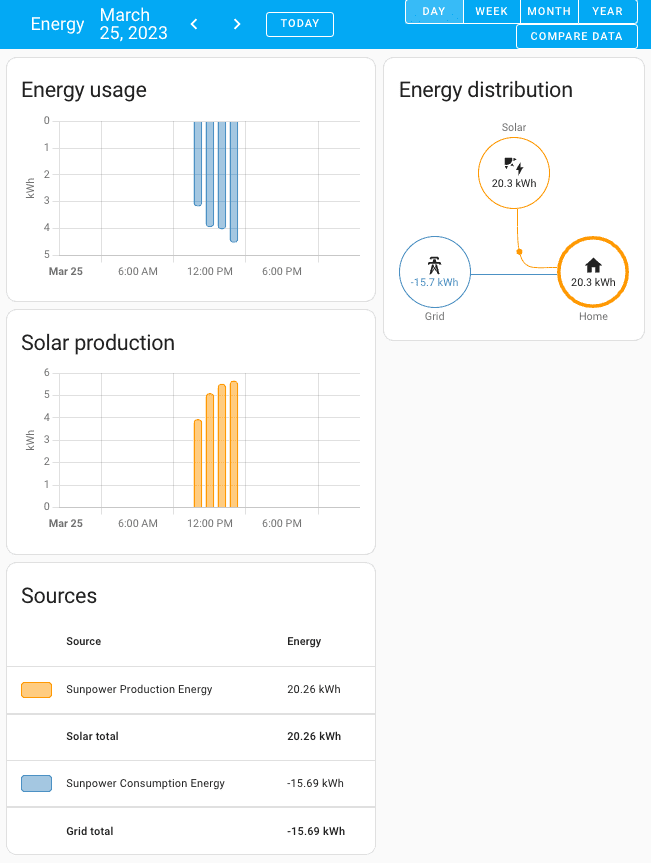
SunPower PVS6 Monitoring App, almost night time
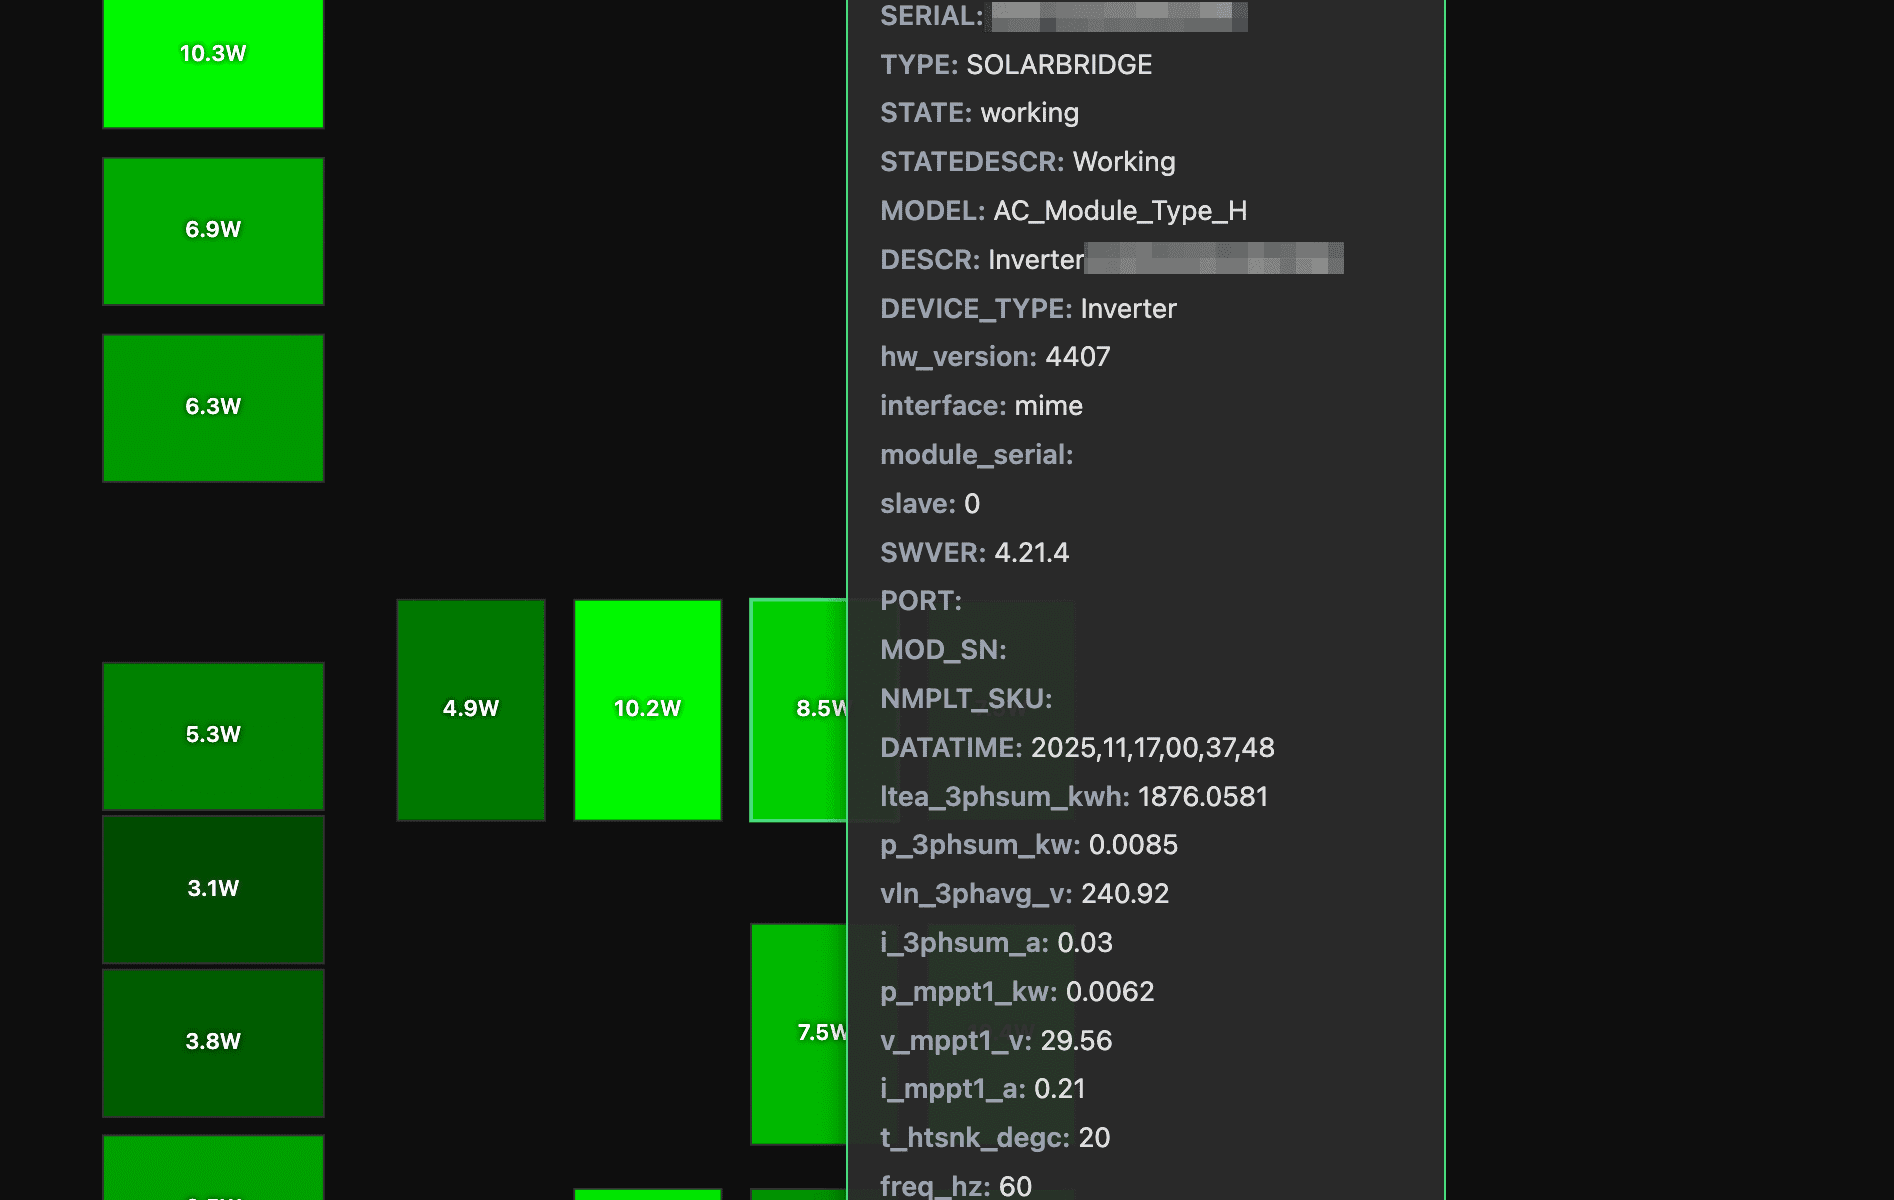
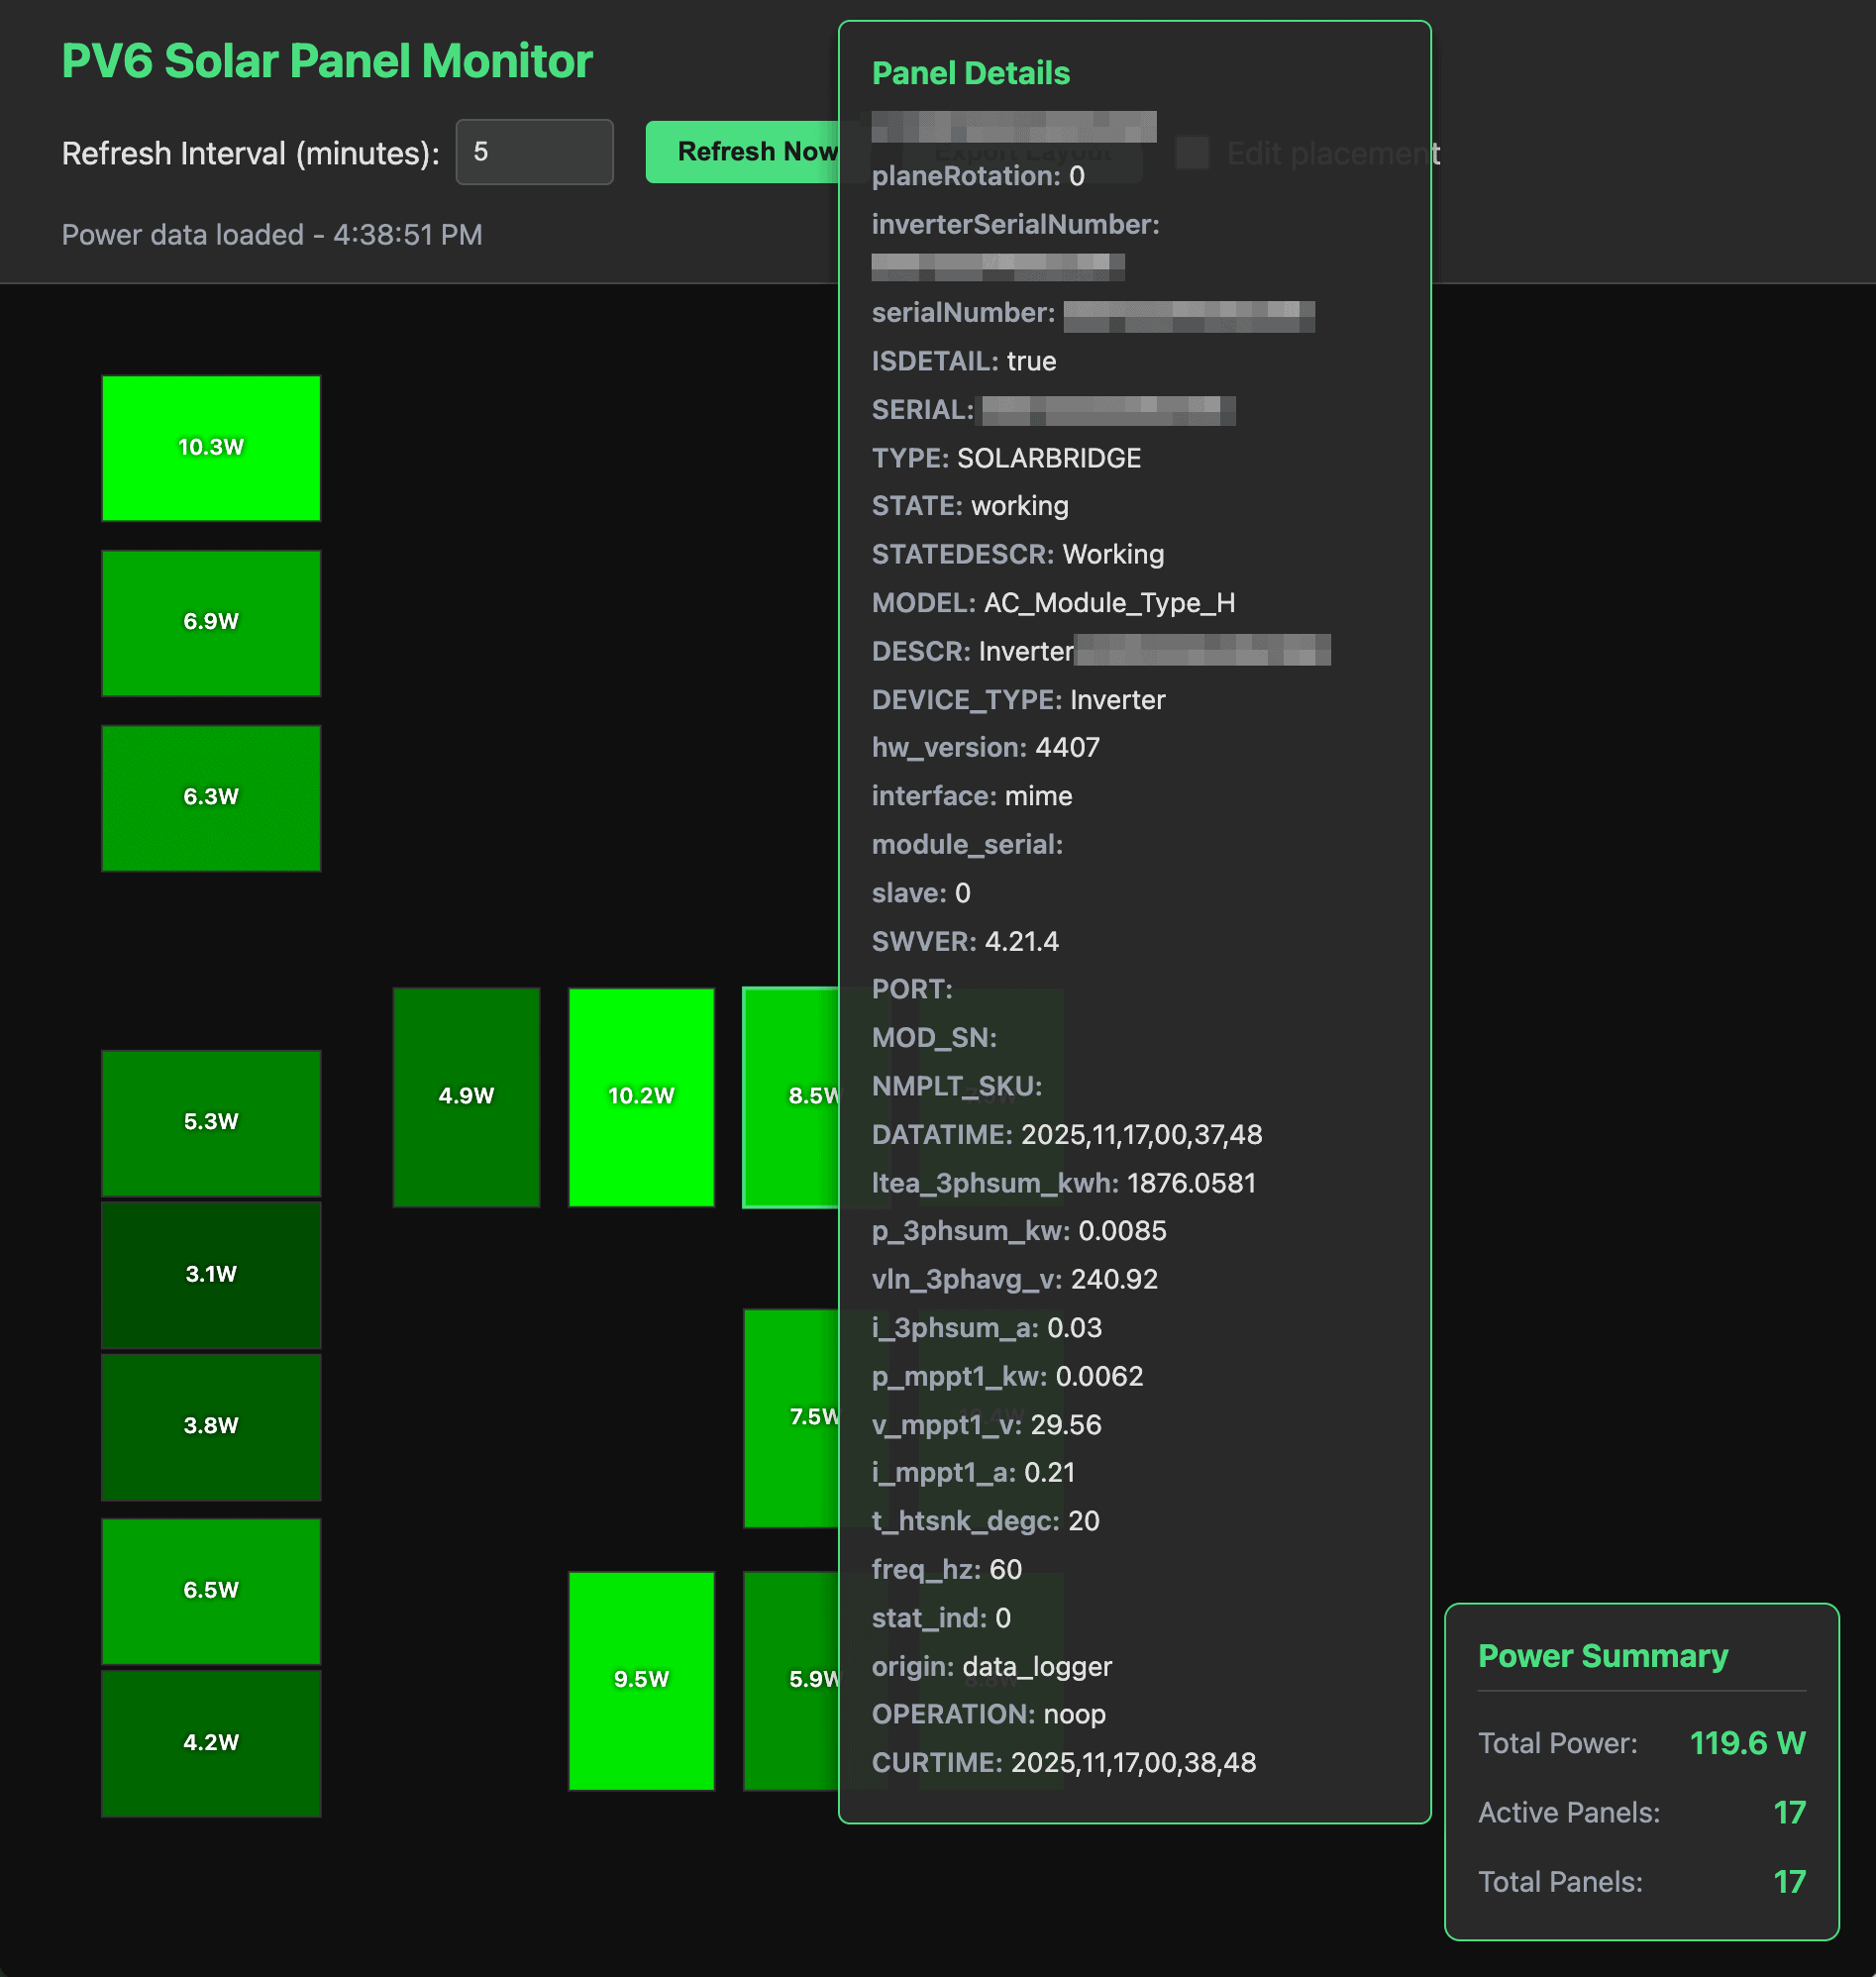
The basic functionality is pretty simple… set a config file to your PVS6 and it will read your panel information (including physical locations – who knew those were in the PVS6 settings?) and then show you the real-time power generation of each panel. And if you want to dig in deeper, all of the panel information can be examined with a simple mouse over. Each panel is shown brighter based on the power it is generating.
If the panel layout isn’t what you expect you can also drag the panels to your preferred locations. That said, the layout for my house just… sort of worked. Your milage may vary.
Oh, since the panel locations don’t change, you can export your layout and speed up access every time you load the web page (yes, do this).
How do you use it? Download from GitHub and just click on the index.html file (well, look at the README.md file to configure it to point to your PVS6 first).
SunPower PVS6 Detailed panel view (again, almost night time)
I’ve tested this on all of one system – mine. So I am sure there are many edge cases that don’t work, but I’m happy to work through some bugs / enhancements as I get some time.
Did you try it? Love it? Hate it? Want a feature or bug fix? Please leave a comment, below!
I wrote You Are Wrong About Your Stupid Account about eight years ago, and since then I have had more than a few friends use it as a guide to upgrade their account security, although a few of them turned to the posting after an exploit that could have been prevented. The world has changed a bit, and I thought it was time to post an update to address some of the newer attacks and ways to protect yourself from them.
If you just can’t make it through 1,194 words and are quitting here, the most important thing is protecting your email account and your phone number. These are usually easy pathways exploiting your other accounts, so invest in keeping them secure.
I start with the new things and then cover updates from the original (which is still a good posting and very relevant today, so check it out if you want more the basics of account security and more context for this update).
Bank and Credit Card Locking
Seems legit
The financial cards you keep in your wallet (Visa, ATM) almost always have a mobile app you can use to manage your account. One of the nicer features a lot of these apps offer is the ability to lock your card, effectively disabling all new transactions on it until you unlock the card, and this is generally instantaneous. So, if you’re like me and go to the ATM once every eight months, you can get extra security by locking these infrequently-used accounts until you need them.
Locking your cards can be particularly comforting if you’ve ever needed to use a sketchy ATM or worry about card skimmers… if your card number and code are stolen, it becomes relatively useless to the attacker.
Finally, most of these apps also offer the ability to add notifications to transactions, so turning this on for all transactions is a great way to detect unauthorized access on your account, which is later that ideal, but catching it fast minimizes the impact.
Phone SIM Protection
Unfortunately a lot of the technology that powers our cell phone systems was created when the world was a much different place, and the use cases were quite different. As a result, there are some exploitable aspects of the systems, like the ability to fraudulently take over someones phone number by having the carrier point it to a different device (SIM swapping). The SIM (Subscriber Identity Module) is basically an ID for your phone and these started off as physical chips, although a lot of phones now generate a Soft SIM (aka Virtual SIM) in software, no chip needed. If a carrier associates your phone number with a different SIM, your calls and text messages now go to the device with that SIM, and this exploit is more common than it really should be.
Most carriers offer some form of protection from this… Verizon and Google Fi refer to this as “Number Lock”, and it prevents the port or transfer of your number. Any popular carrier likely offers the same functionality… turn this on. Really. Really really.
The big risk here is your phone number is often associated as a way to reset your accounts, and in some cases, your phone number is your account, so an attacker taking over your number not only provides pathways to taking over your accounts, at the same time you will be blocked from recovering your accounts. Lock this down.
Note: to make this a little more confusing, many phones offer “SIM lock” on the phone (not from the carrier), which requires a code to enable usage of the SIM (e.g. connect to network, make calls, text). “SIM lock” does not protect you from SIM swapping, other than possible somebody stealing your physical SIM card. You probably do not want to turn this on.
Password Manager Update
Password managers continue to be great, although I’m a little more opinionated on which password manager to use, and generally recommend 1Password. While all password managers mostly do the same thing (you have a master password to get to all of your complex, impossible to remember passwords), that master password can be the achilles heel if anyone is able to get access. And here is where 1Password stands out… for a new device (computer, phone, tablet) to access your 1Password account, it needs to have a key that is only accessible from your unlocked account. So even if your credentials fall into malicious hands, they still can’t access your passwords.
1Password works across websites and mobile apps quite nicely, and also has pretty good group accounts and family plans, making it easy to share specific accounts with the family for things like Netflix, so that everyone has access when one person makes a password change.
One thing I am mixed on is 1Password also offering 2FA (two-factor authentication) on your accounts that support it. While this is very convenient, the whole point of 2FA is requiring two things to access your account (generally, something you know and something you have). If using both password and 2FA functionality for an account through 1Password, this reduces the efficacy (although it is still far better than not using 2FA at all). I have found a use case where this is incredibly useful, where I have an account that is password and 2FA and occasionally I need to share access with someone, and 1Password makes it easy to do temporary sharing and this works great. However, other than that use case, I use separate tools for two-factor authentication.
Two-factor Authentication Update
I’m a little shocked that 2FA (two-factor authentication) hasn’t advanced more over the past 8 years. On the bright side, it is far more common to see in sites, and I have seen more sites with sensitive or valuable data require 2FA. However, there is still an overwhelming number of sites, including banks, that only offer SMS for 2FA, where they text a code to your phone. A major problem with this is your phone number can be stolen through SIM swapping, and this can happen from thousands of, miles away, it does not require access to your phone.
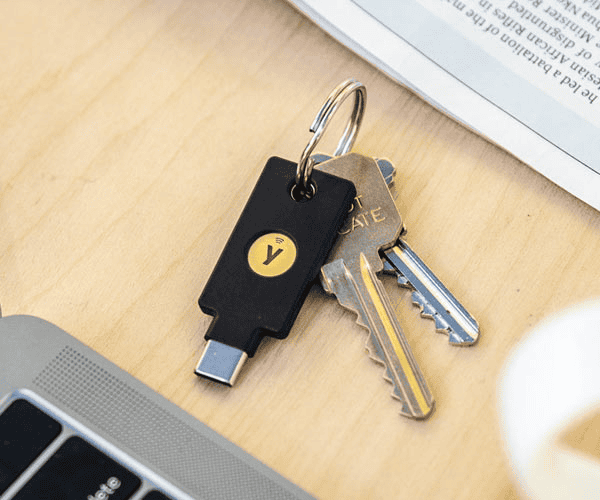
YubiKey 5C NFC (not mine, and not my keys)
I adopted dedicated hardware 2FA for my more critical accounts (email, password manager, financial). These are generally USB keys that generate the necessary response when challenged, and can be used with computers, phones, tablets, etc. The YubiKey 5C NFC is a good example of one that supports modern authentication protocols and can also tap NFC readers instead of plugging in. The downside of hardware keys is they are slightly less convenient, and you really will want to make sure you have two of them and associate them with each account, so that if you lose your physical key, you have a backup and are not locked out and having to go through a likely time consuming process to recover your account.
For a general purpose 2FA app, I am still a fan of Google Authenticator and it has only gotten better, with huge improvements in migrating to a new phone / device, which was pretty painful before.
One of the more practical and super easy to use AI tools I’ve seen is NotebookLM, where one can add documents, text, websites, and more to a notebook and then tell AI to do something with all of the content. I’ve found this incredibly handy for things like adding a link to a keg distributor and telling it “create a list of all beers categorized by style of beer and sorted by ABV” (don’t judge). This is ~30 minutes of work accomplished in less than a minute.
One of the features of NotebookLM is the ability to make a podcast out of the content. I did this for the first time and… holy crap, it’s amazeballs.
One of my more popular (and plagiarized) postings is Causes of Backpacking and Hiking Deaths, so I decided to try the “make a podcast” feature. I’m… blown away. First, I encourage you to read the original post, and then listen to the NotebookLM created podcast:
To be clear, I gave no other direction… I added the website and clicked the “make podcast” button.
So, the obvious thing would be “sure, Brett… it’s taking your content and summarizing”. But that’s the magic, it’s not! So much of the commentary comes across as observations that are not mentioned in the original post. For example, my post mentions that hiking is more dangerous than skydiving, but the podcast makes the observation it is because we feel more comfortable in that unsafe situation. AI also picks up that this is obviously a humorous take on the dangers.
The AI podcast also extrapolates what was in the blog post, where I mentioned the danger of temperatures (hot and cold), and the podcast adds the phenomenon “paradoxical undressing” (never mentioned in my post), and the fact that with heat stroke you may not feel thirsty.
In talking about health issues, my post mentions the problems, the podcast comes up with ways to prepare for this possible risk. And while I mention the danger of too much water (drowning), the podcast highlights the risk of flash floods and canyons. None of that was in my post.
Following the summary of my post, the AI podcast hosts go into a dialog about how to protect yourself from all of these dangers. These include space blankets, lightning avoidance, and proper water treatment. None of that was in my post.
I’ve heard a few other of these podcasts where people take a ton of content and make an easy to consume podcast from it, and I have consistently been impressed. But even if you don’t need a podcast. I encourage you to take a look at NotebookLM and see if it can help you eliminate some of the more mundane tasks in your life… summarizing long documents, reformatting data from a website, or identifying insights.
For example. I uploaded the Unabomber Manifesto (again, don’t judge) and asked, ” show examples of contradictions in this manifesto”. Some of the insights included:
In the introduction, the manifesto states, “The Industrial Revolution and its consequences have been a disaster for the human race.” However, the author also acknowledges that the Industrial Revolution has increased the life expectancy of those in “advanced” countries.
The author acknowledges that “primitive man is physically less secure than modern man,” but argues that modern man suffers from more insecurity because he lacks control over his environment. But, the author also argues that freedom, which the author defines as having “power…to control the circumstances of one’s own life,” will be increased if “the power of the INDUSTRIAL SYSTEM [is] broken.” It is unclear how the power of individuals can increase if the industrial system, which has given humans some power over nature, is destroyed.
And while these are not the deepest insights, they took less than 30 seconds of my time to surface from a relatively large document.
I highly recommend NotebookLM to everyone, especially anyone that doesn’t have much experience with AI. It’s really pretty simple to use and can make a lot of long, mundane tasks incredibly quick and simple.
Have you found a great use for NotebookLM or some other cool AI tool that is easy for anyone to start using? I’d like to hear about it, please leave a comment below!
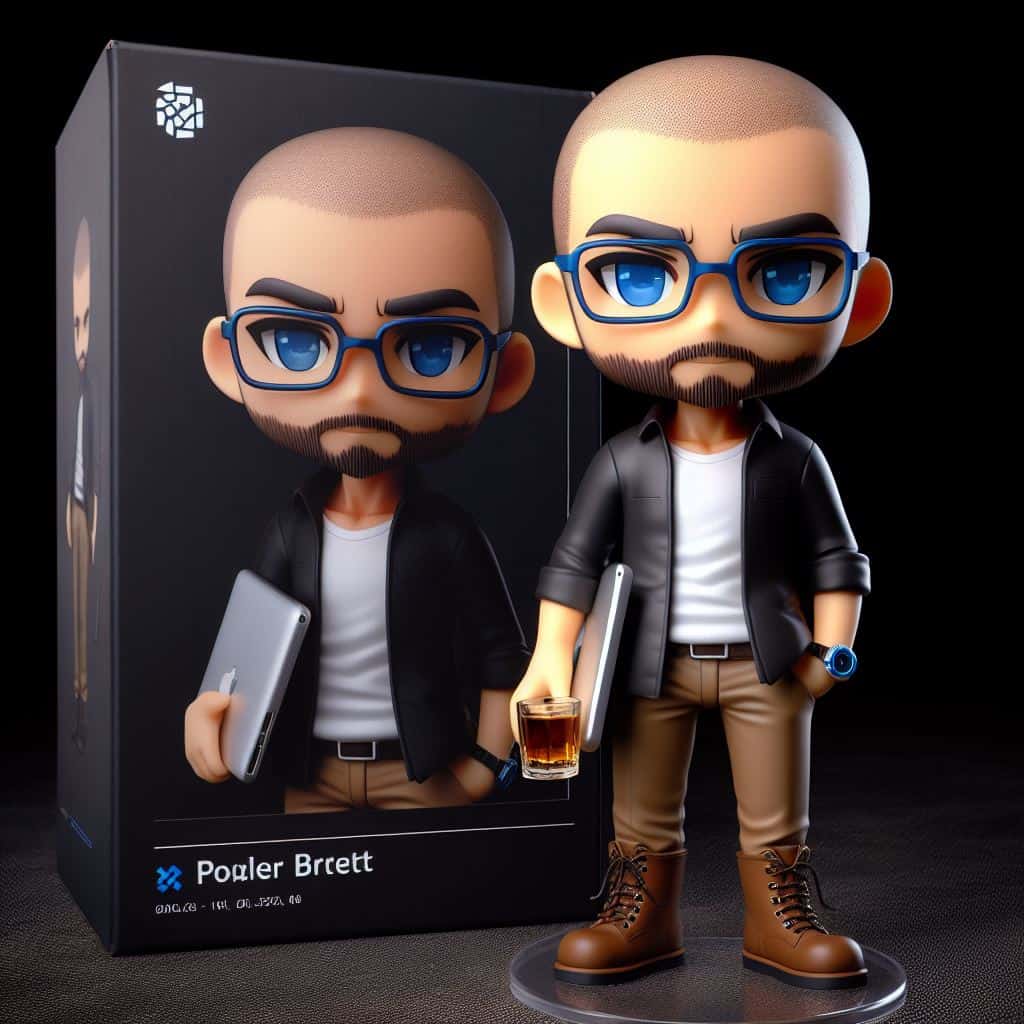
If you’ve ever wanted to see a figurine of yourself but you have no artistic talent, AI image generation can make that dream come true, and you can try it for free. I jump right into the “how to” and add my boring commentary to the end of this post, so you can skip it.
Brett, in real life
I’m using DALL-E for my image generation which requires a paid subscription, but you can get free access to it through Microsoft Bing Image Creator (requires a free Microsoft account). Once you have signed in, look for the text input field next to the two buttons “Create” and “Surprise Me”. The text field is where you describe what image you want AI to generate, then you click “Create” and a few seconds (or minutes) later, up to four images will be displayed. This process is called “prompting”, which is a common way to guide AI to generate the desired output. But getting AI to do exactly what you want is a little like herding drunk cats, so crafting the prompt can take some effort and some understanding of how things work under the hood. We’ll skip that for now and just start making fun things…
Anime figurine Brett with laptop and margarita
The structure for the prompt is “Anime figurine of <my description, skin tone, eye color, hairstyle, outfit>. The figurine is displayed inside a box with <text on box> and logo for the box, allowing visibility of the figure, typography, 3D render”. To make something that looks sort of like me, I used “Anime figurine of a shaved head, bald on top, nerd, white skin tone, dark gray hair, blue eye color, brown short beard, brown eyebrows, black shirt, jeans, Converse high tops, wearing blue rimmed glasses, wearing a watch, holding a laptop and a margarita. The figurine is displayed inside a box with Brett and logo for the box, allowing visibility of the figure, typography, 3D render“
AI reminding Brett of what he lost
Once you’ve tried this for yourself, you probably noticed a few things… Most obviously, somehow the AI didn’t do what you thought you told it. For example, while I prompted “bald on top“, one of my images clearly had hair, which might be the AI getting confused with the conflicting “dark gray hair” in the prompt. I have found replicating hairstyles, even bald hair styles (if… that’s a hair style?), can be challenging. I’ve yet to be able to get any consistency with hair only on the sides and back of the head. The other thing you will probably notice is the wild things that can show up in the image, especially when it comes to text generation, where AI tends to get… creative. Some of the words you use in your prompt may show up in the image, and misspelling is not uncommon.
Cheers!
There is considerable variation in the images, some looking more like the giant-headed Funko Pop figurines, and others having pretty realistic proportions. Prompting for another common outfit I wear, “Anime figurine of a shaved head, bald on top, nerd, white skin tone, dark gray hair, blue eye color, brown short beard, brown eyebrows, black shirt, tan pants, brown leather boots, wearing blue rimmed glasses, wearing a watch, holding a laptop and a pint of beer. The figurine is displayed inside a box with Brett and logo for the box, allowing visibility of the figure, typography, 3D render” created something a little more proportional.
Funko Pop Brett
So play around a little and see what you get… if anime isn’t your thing and you really love the Funko Pop style, try swapping out the prompt, “Funko style figurine of a shaved head, bald on top, nerd, white skin tone, dark gray hair, blue eye color, brown short beard, brown eyebrows, black shirt, jeans, Converse high tops, wearing blue rimmed glasses, wearing a watch, holding a laptop and a margarita. The figurine is displayed inside a box with Brett and logo for the box, allowing visibility of the figure, typography, 3D render“.
This gallery contains more examples:
Boring Commentary
A little over a year ago I wrote Robots Building Robots: AI Image Generation, where I used my laptop for AI image generation, meaning I had to use substantially less powerful AI models than are available in the cloud, where processing power and memory can be massive. The less powerful model was fine for the specific application I had in mind (a cartoon-like sketch of a robot for a sticker), but a few people commented that the quality of the AI images was average, and some were skeptical about AI’s capability.
In that same post, I mentioned Midjourney, which at the time version 4 was just coming out and already looking pretty amazing. In the 14 months since then, the quality and capability has continued to improve at an astonishing pace. For a detailed look at Midjourney specifically, check out this post from Yubin Ma at AiTuts. In less than two years, this model has gone from distorted human faces (some almost unrecognizable) to photo realism.
Female knight generated by Midjourney, V1 (Feb 2022), V4 (Nov 2022), V6 (Dec 2023), images from AiTutsVintage photo of girl smoking generated by Midjourney, V1 (Feb 2022), V4 (Nov 2022), V6 (Dec 2023), images from AiTuts
I have been surprised by both the rate at which the quality and the versatility of AI generated images has increased, with the anime figurines being one of the more recent (and delightful) examples of something AI can create unexpectedly well. I’m limiting this post to still image generation, but the same is happening for music, video, and even writing code (my last three hobby programming projects were largely created by AI). It’s reasonable to assume that AI will make substantial improvements to generating 3D image files, so soon you’ll be able to 3D print your cool little anime figurine.
There are, of course, significant implications of having computers provide a practical alternative to work that used to require humans, and much like the disappearance of travel agents once the Internet democratized access to booking travel, we should expect to see a dramatic reduction in demand for human labor, and this will be disruptive and upsetting… some professions will be nearly eliminated. I don’t want to be dismissive about the human impact of more powerful automation.
At the same time, AI can empower people, and create entirely new opportunities. Large language models (LLM) create the opportunity for customized learning, where eventually individuals all across the planet can have a dialog with an AI teacher, navigating millions of human years of knowledge. More and more, people will not be limited by their resources, they will only be limited by their ideas… The average person will be able to build a website, or a phone app by describing what they want, and someone considering themselves as “not artistic” will be able to create songs, artwork, or even movies that will eventually be box office quality. AI will also likely play a significant role in things like medical advances and energy efficiency, things we generally consider good for humans.
Did you enjoy making yourself into an anime figurine? Did you come up with a prompt that made a super cool image? Did you figure out how to get my male pattern baldness accurate on the figurine? This my hot take on being optimistic about AI is horrible? Leave a comment, below!
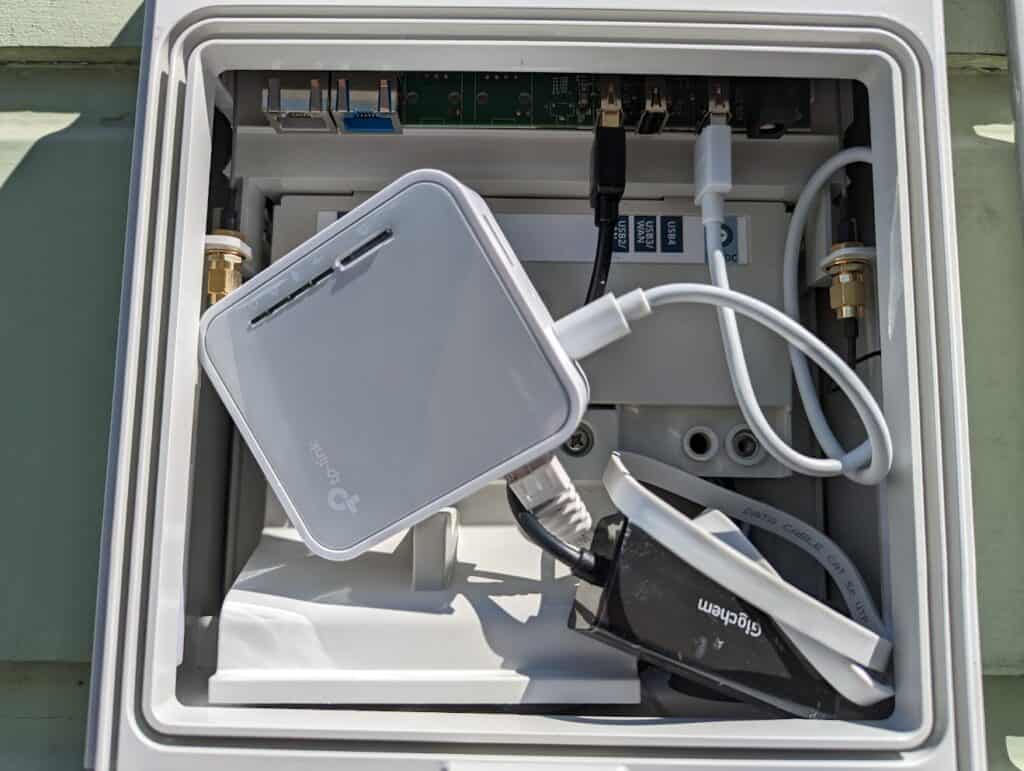
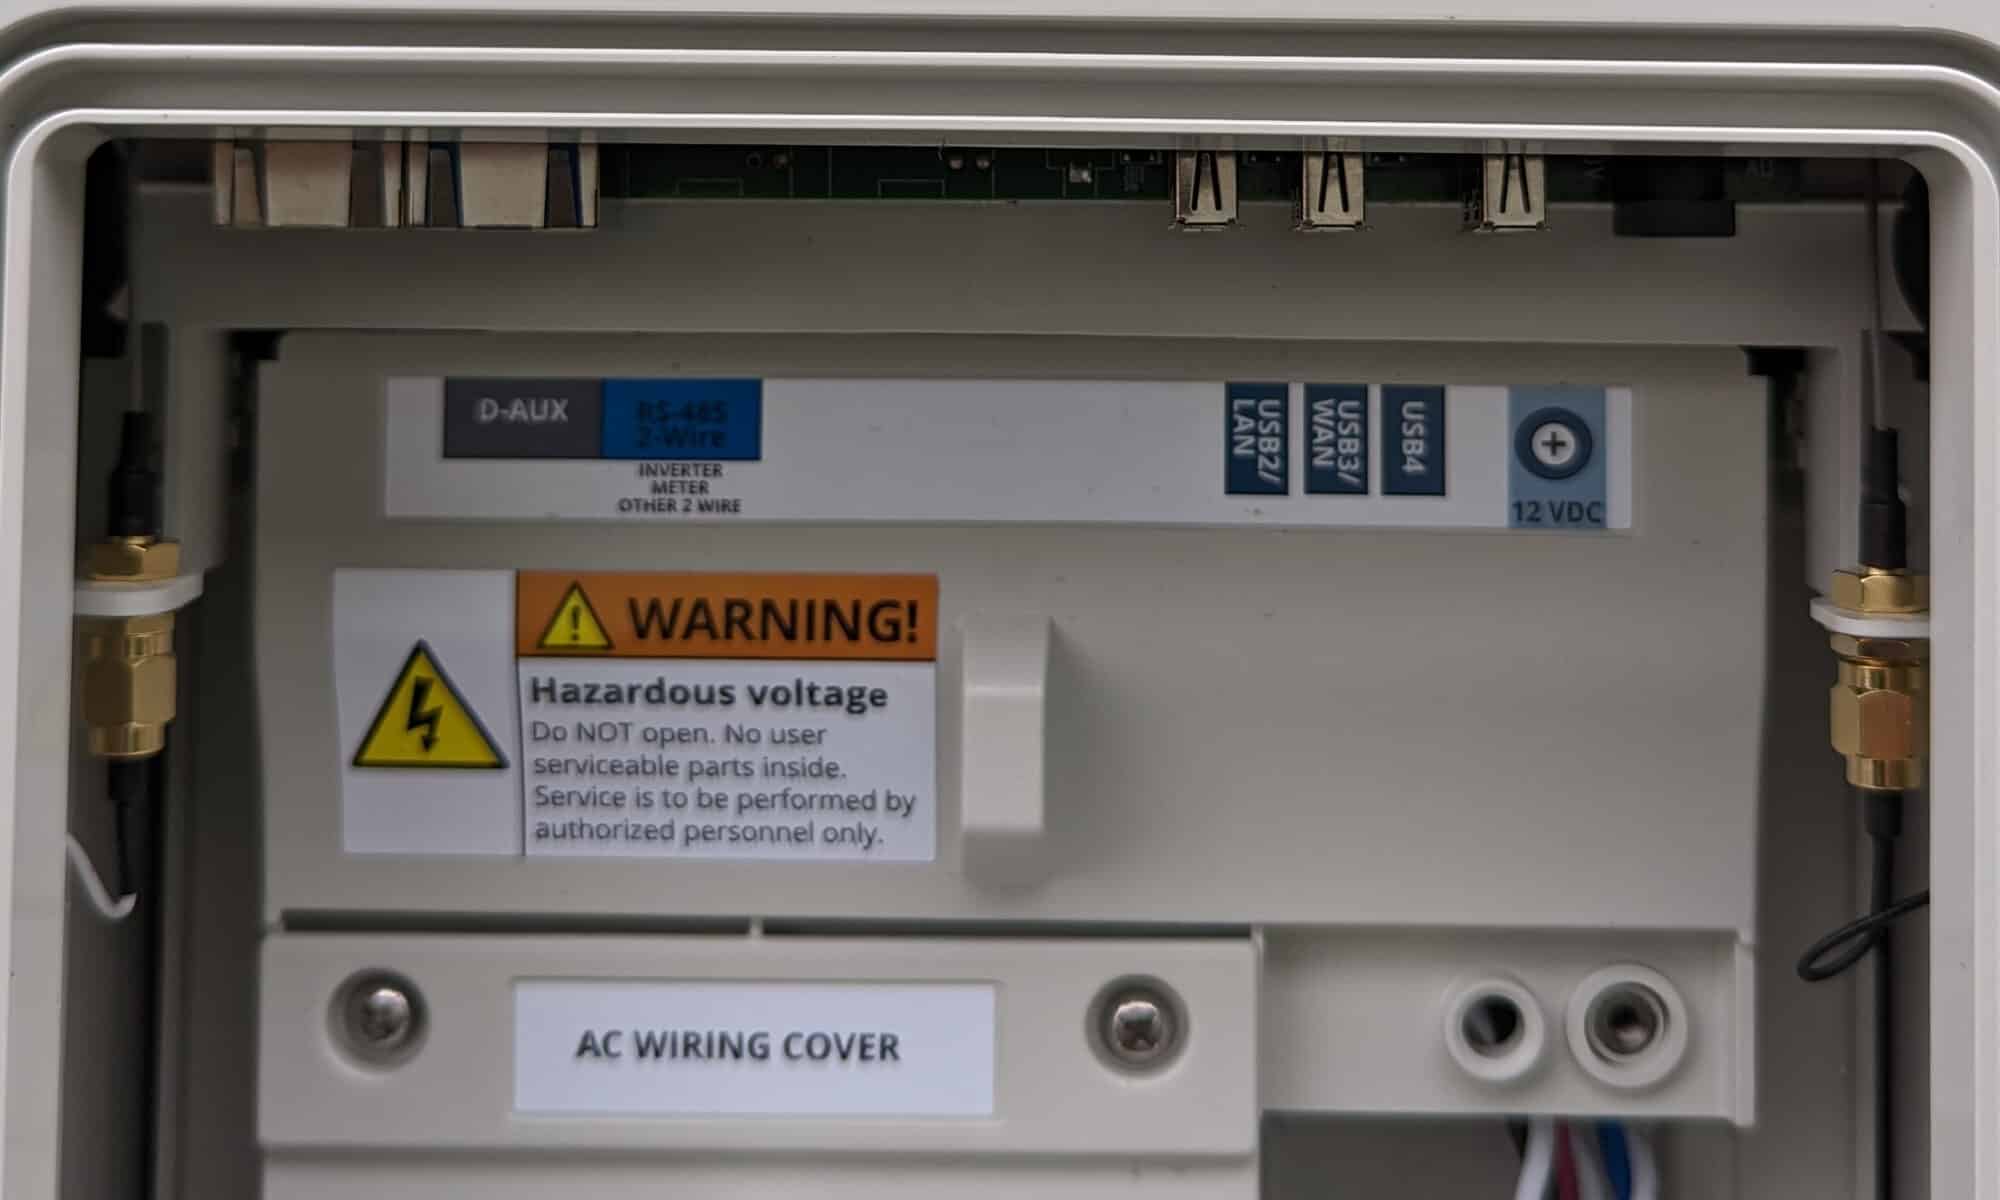
The first thing was getting the SunPower PVS6 administrative interface. Since I didn’t have easy cabling access, I used a $7 ethernet adapter and a TP-Link AC750 Wireless Portable Nano Travel Router (TL-WR902AC). There is a cheaper model of the TP-Link that would have worked just fine, but even at $39 it was less expensive than most of the lowest-end Raspberry Pi crazy-ass prices right now. Power for the TP-Link comes from the LAN4 port on the PVS6, and the ethernet connects to USB2/LAN. The TP-Link is configured in “Router Mode”, where it connects by wired ethernet to the PVS6 and creates a separate network for all devices that connect by wifi. If you do this, you will want to configure the TP-Link to use a network different than your home network (e.g. if your home network is 192.168.0.0/24, use something like 192.168.2.0/24).
TP-Link and ethernet dongle crammed in the SunPower PVS6
At this point you should be able to connect to the TP-Link wifi and test access to the administrative interface at http://172.27.152.1.
Of course, the problem now is we need to connect the home network to the SunPower network, but there is some nuance… we only want the web traffic. Very specifically, we do not want the TP-Link to connect to the network and start giving new IP addresses to our home network, which is also why you don’t just plug the ethernet from the PVS6 into your home network.
I happen to have a home file / everything else server that runs on a Raspberry Pi, and already has Apache running. That server connects to my home network via an ethernet cable, so its wifi was unused and available. I connected to the SunPower wifi (SSID “sunpowernet”):
sudo nmcli d wifi connect sunpowernet password "5ekr1tp@$$"
Finally, I need to let the server know that when the destination network is the PVS6, it needs to use the wifi connection, not the ethernet connection:
sudo ip route add 172.27.152.0/24 via 192.168.2.1
This is a great time to mention that it would be good hygiene to setup your server to have firewall rules blocking incoming traffic from the TP-Link, other than DHCP and established connections, in case the PVS6 is ever compromised.
Reverse Proxy
While HAProxy is super awesome and you should absolutely use it if starting from scratch, I happen to have a home server that gets 5 requests per month and was already running Apache, so I wanted to do as little extra work as possible. Fortunately, Apache has a reverse proxy, and that makes this pretty easy. I setup a virtual host with the following sunpowerproxy.conf config:
The virtual server is going to expect the HTTP request to come to a server named “sunpowerproxy” (or whatever you name it), so you’ll need to add that DNS entry pointing to the ethernet address, not the wifi address.
After a few seconds you should get a JSON blob listing all of your devices.
Home Assistant Configuration
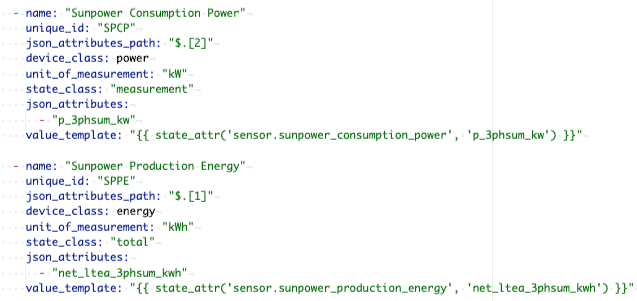
Finally, we need Home Assistant to be able to pull the values from the proxy. The RESTful integration provides a pretty easy way to do this… here is a basic configuration to get the current power usage and overall energy, although a lot more information, including details for each individual panel, is available:
Now you should have the ability to add the SunPower sensors, and configure the Energy dashboard!
The Energy dashboard in Home Assistant
Now that I have this working I will probably realize that the hass-sunpower using HACS is a way better solution, but only the RESTful integration would need to change, all of the network and proxy configuration would carry over.
Finally, if you’ve made it this far, you probably realize that it would be way better if SunPower offered a reasonable API for home integrations, instead of making people take these ridiculous steps… please let your SunPower contact know!
What’s your SunPower and Home Assistant experience? If you’re following in my footsteps (yikes), how did it go?… please leave a comment, below!
Update November, 2025: see my most recent post on self-hosting PV6, which has my latest recommendations following the SunPower bankruptcy.
Well, if you landed on this post you either have a need to cure your insomnia or you have a very specific problem. I recently decided to become a sun farmer, and went with SunPower, which is great, but they don’t offer integrations beyond their decent but limited web and mobile apps. In particular, I wanted to integrate with Home Assistant, because… well, just because.
The main solar interface from SunPower is the PVS6 (successor to the PVS5), and by connecting to an administrative interface it is possible to pull some detailed data like specific energy output and health for each panel. The good news is the PVS6 comes with two ethernet ports, one for a WAN to connect to their servers and one for a LAN that will allow access to the administrative UI, and all one needs to do is connect to said port and then… hey, WTF? My PVS6 doesn’t have either of these ethernet ports! So, yeah… evidently there is a new version of the PVS6 that does not have ethernet ports, and the primary WAN connection is via wifi.
A blurry photo of the ethernet-port-less SPV6
After digging around teh webz, it seems that the PVS6 USB ports will work with a USB to ethernet adapter, but several people reported some adapters didn’t work. Unsure if the magical solution is the adapter needs to be USB 2.0, but I found a $7 adapter on Amazon, and it just worked. I connected my laptop to the USB2/LAN port, the PVS6 assigned an address to my laptop, and browsing to http://sunpowerconsole.com/ provided a web administration interface. However, PVS6 is not within convenient ethernet wiring distance, so I dug around some more and found Dolf Starreveld’s page, which included an amazingly comprehensive doc, Monitoring a solar installation by tapping into a SunPower PVS5 or PVS6. This doc starts with the assumption you have a PSV* with an ethernet connection and want to get to wifi, and with my USB to ethernet dongle, that’s what I had, so all I needed to do was mount a Raspberry Pi in the PSV6 to act as a router / bridge to my network. But while reading his doc, I noticed a mention of a hotspot interface available for a limited time after PVS6 power-up, and a link to a SunPower doc on commissioning the PVS6 via wifi… this sounded promising.
Sure enough when I scanned for wifi connections, I found a SunPower SSID that matched my system. And since my system had been on for days, it didn’t appear that the 4-hour window applied, so great news! The formula for the SSID is “SunPower” immediately followed by characters five and six of the PVS6 serial number; immediately followed by the last three digits. The password follows a similar formula, characters three through six of the PVS6 serial number; immediately followed by the last four digits. Once connected, I had the exact same access I had when directly connected via ethernet.
But the cool stuff isn’t really in the web UI, you need to call it directly. For example:
Will show all devices and panels, with a ton of data on each. Dolf Starreveld’s document has a ton of details.
Since I don’t plan to run this from my laptop, I still need to bridge the network… several people have written about using a dedicated device like a Raspberry Pi, including Scott Gruby’s Monitoring a SunPower Solar System, where he uses a very lightweight Raspberry Pi Zero W, and then a simple haproxy setup. However, I’d like to avoid another device (especially with the current price for Raspberry devices – holy crap), and my Raspberry Pi 4 file server connects via ethernet, so I’ll likely use its wifi to connect to the PSV6 and run the proxy from there. After that I’ll configure Home Assistant and likely bore you with another posting.
And, no sooner do I get to the end of writing a post when I realize that the wifi network has vanished, so I either need to find a way around that problem or else I’m adding a router to my PSV6.
Are you doing anything interesting and hacky with your SunPower system? Do you have cool integrations with Home Assistant? Did you stay awake through this whole post?… please leave a comment, below!
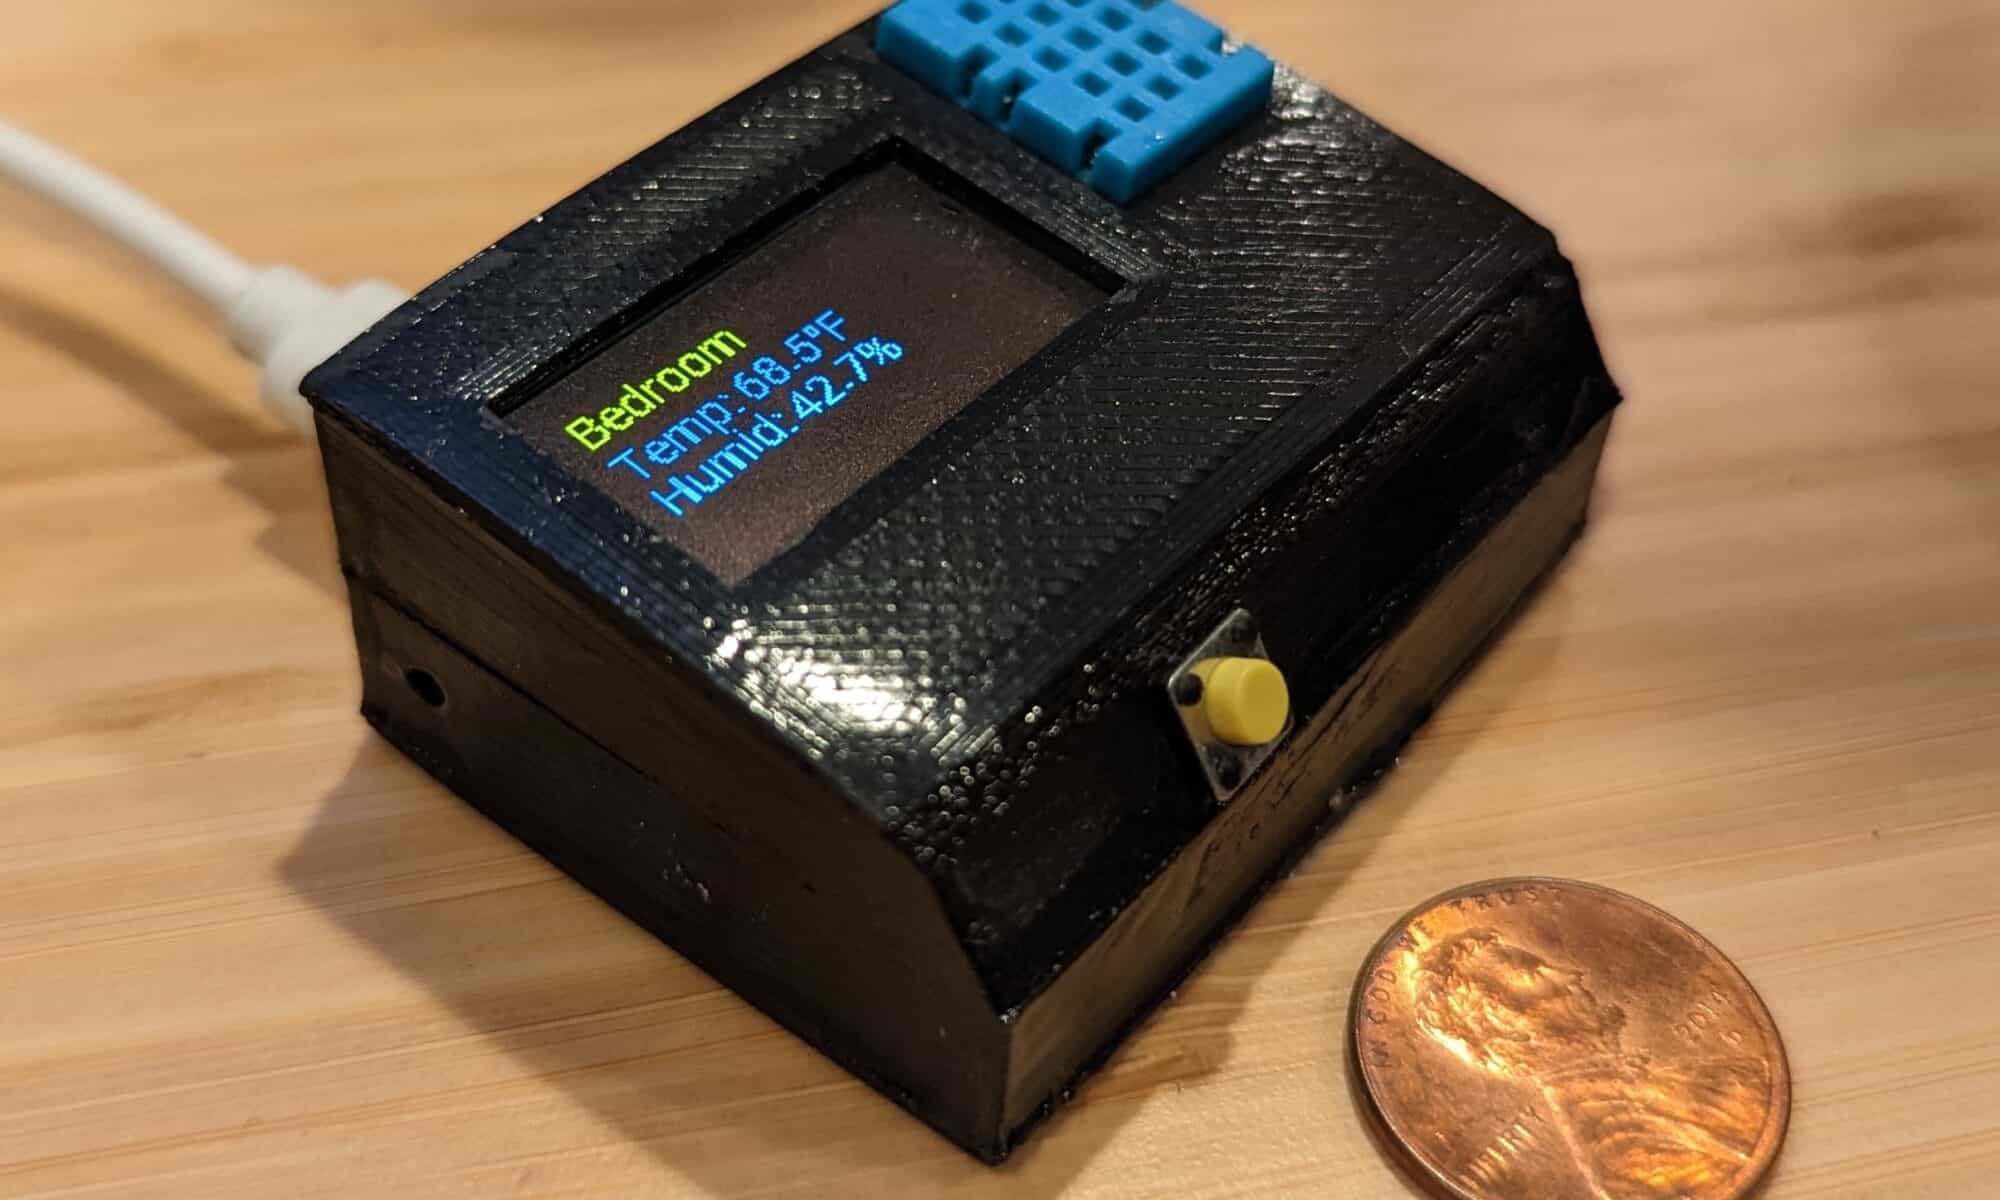
For the 3 people that have been reading my posts, you know my journey from ESP8266 hacking off the shelf smart switches to creating custom devices, most of which I connect to Home Assistant so that smart devices are secure and don’t rely on the existence of any particular vendor. The next step in this journey is using ESPHome to simplify creation of custom software for ESP8266/ESP32. For my first project I created ESPHome Temperature and Humidity with OLED Display.
Why ESPHome?
Why use ESPHome instead of something like Arduino Studio? Simply put, its simple but powerful. As an example, I made custom software for a temperature & humidity reader for my bathroom that was 8 custom lines of code (which wasn’t really code, but configuration). YAML configuration files provide access to a ton of sensors, and if you need to dig in deeper with more complicated functionality, ESPHome provides Lambdas that allow you to break into custom C++ at any time.
One of the other cool things about ESPHome is, while it integrates seamlessly with Home Assistant, the devices are meant to run independently, so if a device is out of range or has no network connection, it still performs its functions.
And I wanted to learn something new, so…
Why This Sensor?
I have a few temperature sensors around the house and I also keep one in the camper van, mostly out of curiosity so I can compare it with the in-house temperatures using graphs on Home Assistant. However, I realized that when I went camping I wanted access to the temperature, but couldn’t do so without being connected at home. The old version of the van thermometer was based on an ESP8266 Garage Door opener (I never shared that posting, so sorry, or you’re welcome) and I didn’t want to update it with a display screen, as I really don’t need that for a garage door (yes, I realize something not being needed usually doesn’t stop me from building it). I decided that I might as well take the opportunity to use ESPHome since it was simple and worked offline.
It’s Time to Build
I won’t go into the details of setting up Home Assistant, but if you are into home automation at all, it is super awesome. Installing the ESPHome add-on gives enables the flashing and managing of ESP8266/ESP32 boards, and they automatically connect to Home Assistant at that point.
For the lazy, ESPHome is generally a few clicks and a little copy pasta. For this project, it’s no different, with the step-by-step details available on my Github project page.
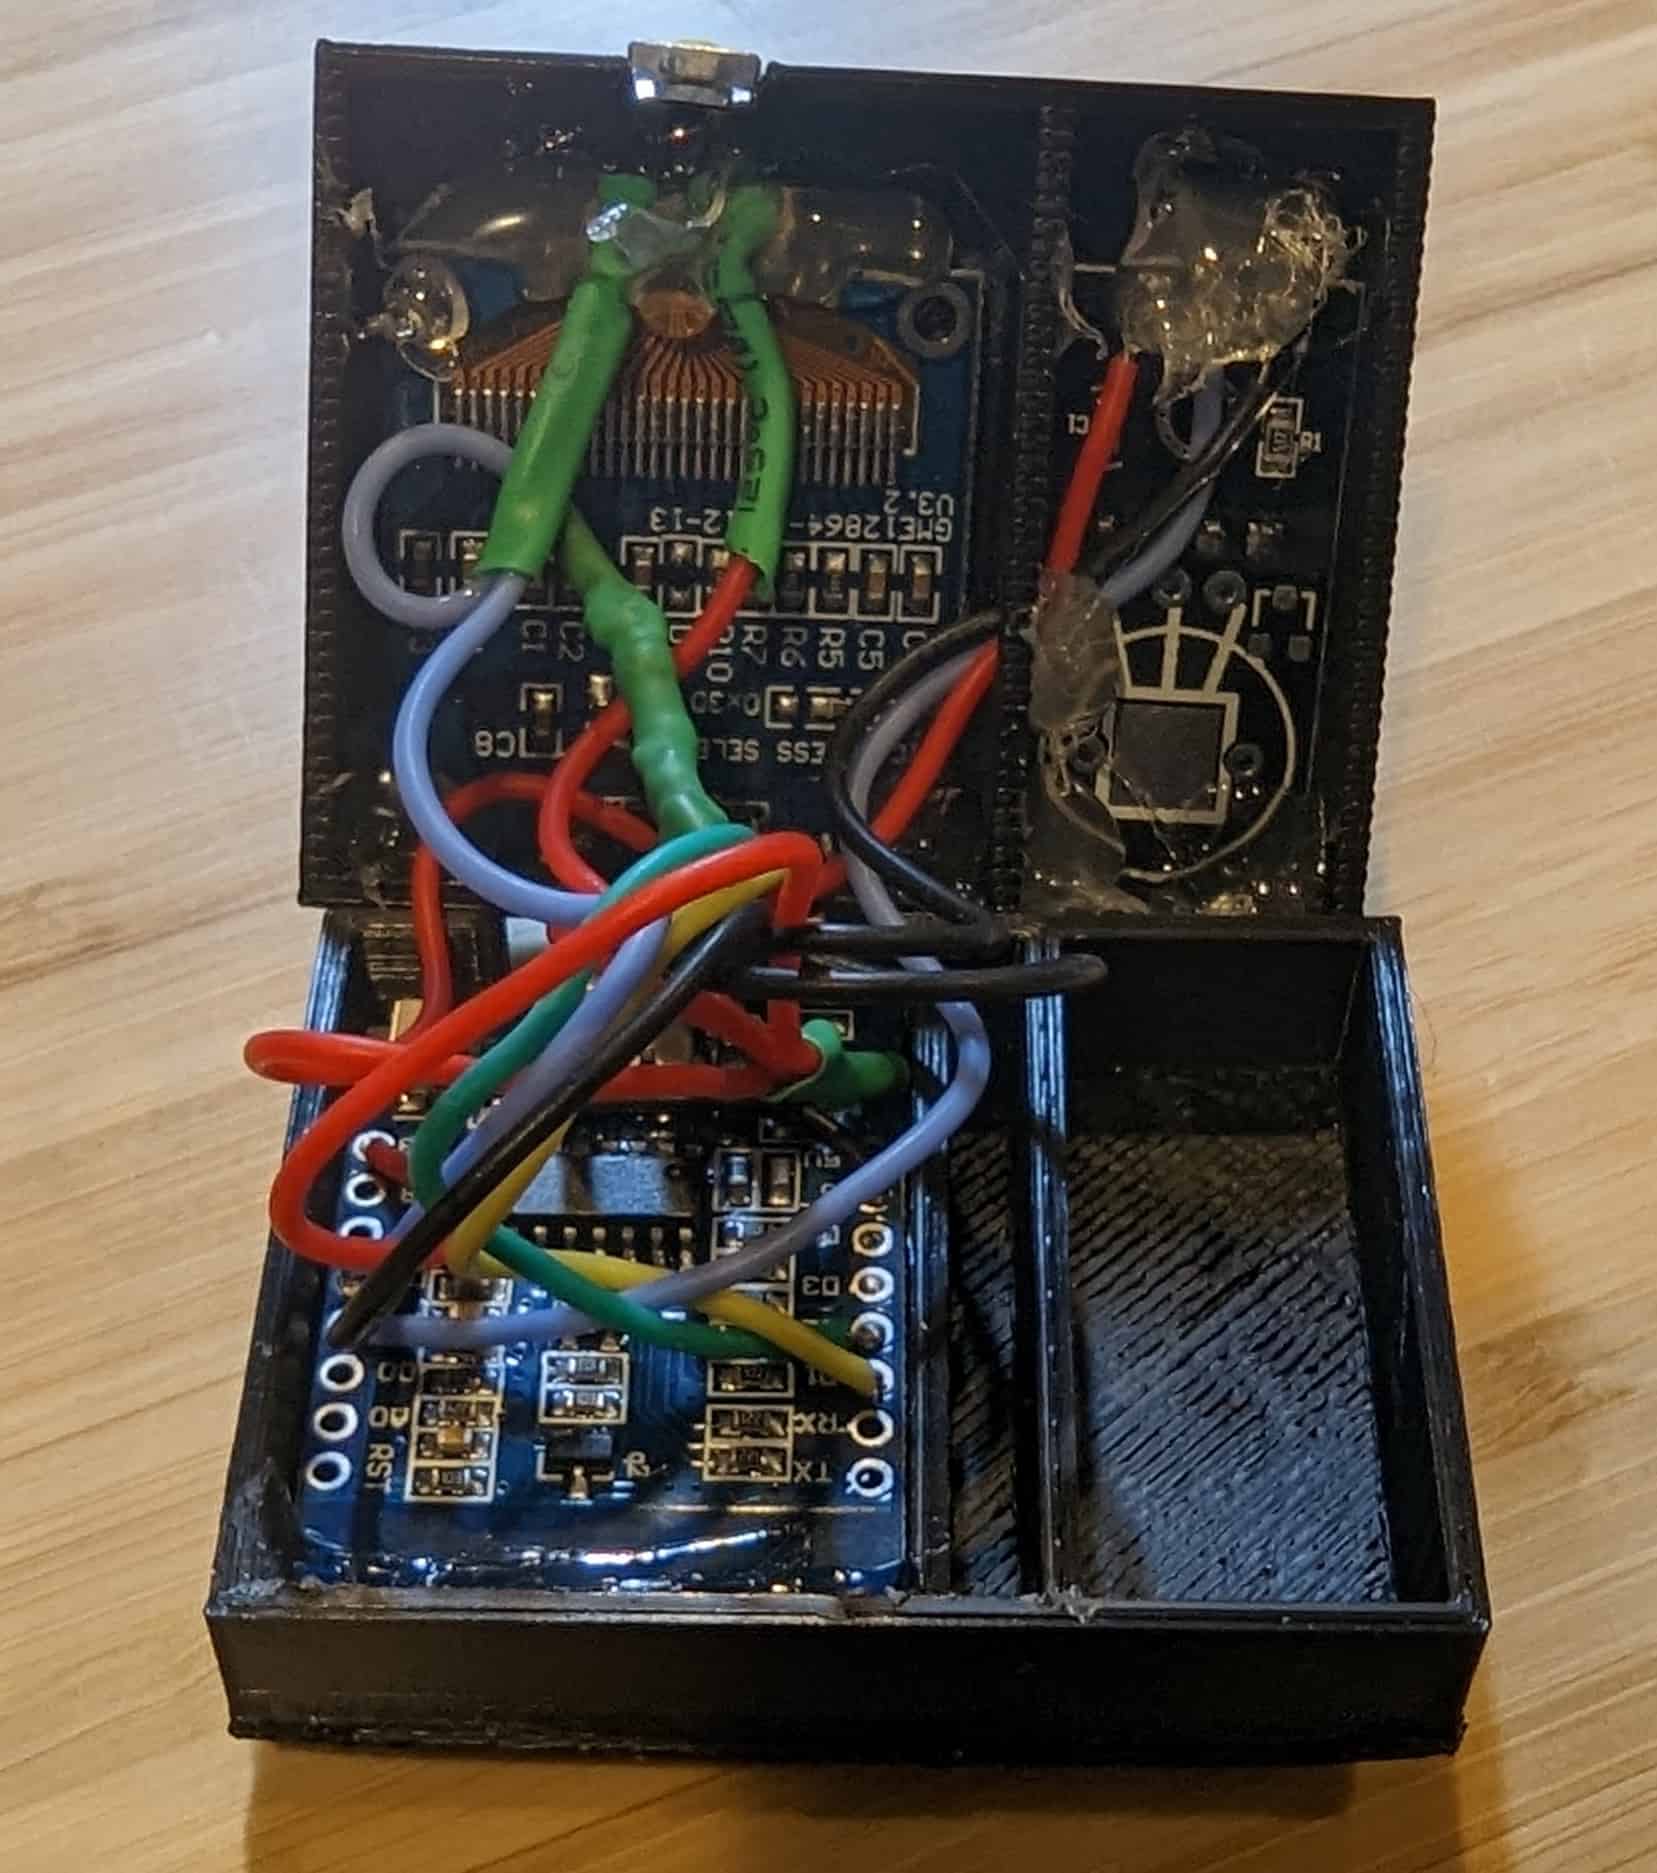
Wiring complete on DHT11 and ESP8266 (ESP-12F) before gluing case together
For the hardware, I used the very tiny ESP-12F, DHT11 sensors, this OLED display, and a few miscellaneous components. All of these fit pretty nicely in the case, although it is a pretty snug fit, so I highly recommend a very thin wire, and this 30 Gauge silicone wire was super great for the job. Exact components, wiring diagram, and the STL files to 3D print the case are on my Github project page.
When assembling, removing the pins from the DHT11 board and soldering the wires directly to the board will allow it to be flush against the case, giving better exposure to the sensor and fitting better. The DHT11 is also separated from the ESP8266 board as I was hoping to create some insulation from any heat from the board impacting the temperature reading (not sure that work). There is a hole between the chambers to thread the wires, and I suggest a bit of hot glue to block air flow once wired.
As you can see in the photo, I used generous dollops of hot glue to hold the components in place… it isn’t pretty, but nobody will ever see it (well, unless you photograph it and blog about it, in which case still, probably nobody will see it). I sealed the case with Zap-A-Gap glue, as I found original Super Glue was way less effective.
Instructions
Plug it in.
Okay, well… it’s a little more than that. The screen will alternate between showing the temperature and humidity in text format and a 24 hour graph that is a bit useless for now since I am not sure how to get the historical values to label the graph. The button will toggle screen saver mode on / off, and the screen saver activates automatically after a short amount of time.
If you want to get a little fancier, I have this sensor in the bathroom and it will turn the vent fan on (via Home Assistant) when the humidity reaches a certain level… it’s useful for anything where you want to control devices based on temperature or humidity, and even more useful if someone might want to see the temperature.
Are you doing home automation with ESPHome? Do you have suggestions or requests? Did you actually read this blog post for some reason? I want to know… please leave a comment, below!
I frequently commute on BART and wanted a convenient way to tell when I should start walking to the train station, ideally something that is always accessible at a glance. A gloomy Saturday morning provided some time to hack together something…
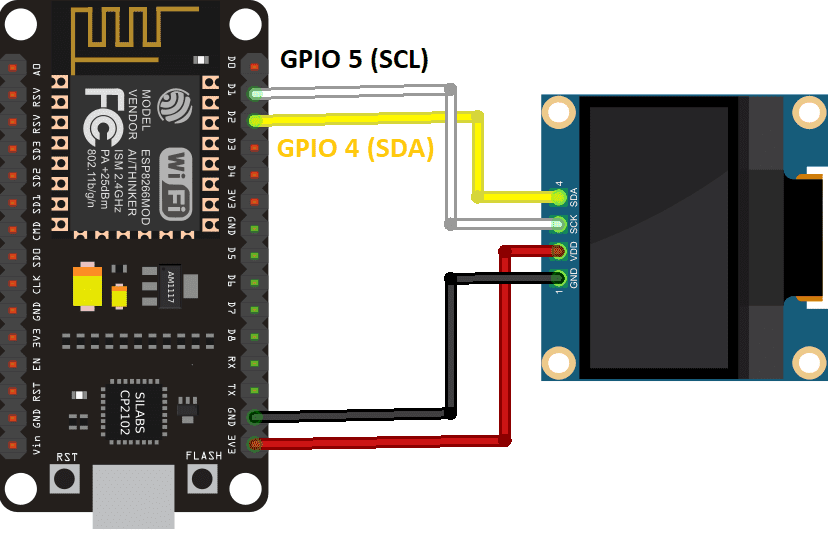
ESP8266 to SSD1306 wiring diagram
I had already purchased a ~1 inch SSD1306 display and had extra ESP8266 boards laying around, so I figured I would start there. Wiring the screen to the board is super simple, just 4 wires (see diagram).
From there is was pretty simple to pull the train real-time data using BART Legacy API. BART also offers modern GTFS Schedules, which is the preferred way to access the data, but from what I could tell, this would make the project significantly more difficult given some of the limitations of the ESP8266. So, I went the lazy route.
Coding was pretty simple, most of the time was spent rearranging the elements on the screen. Well, actually most of the time was spent switching from the original JSON and display libraries I chose as I wasn’t happy with them.
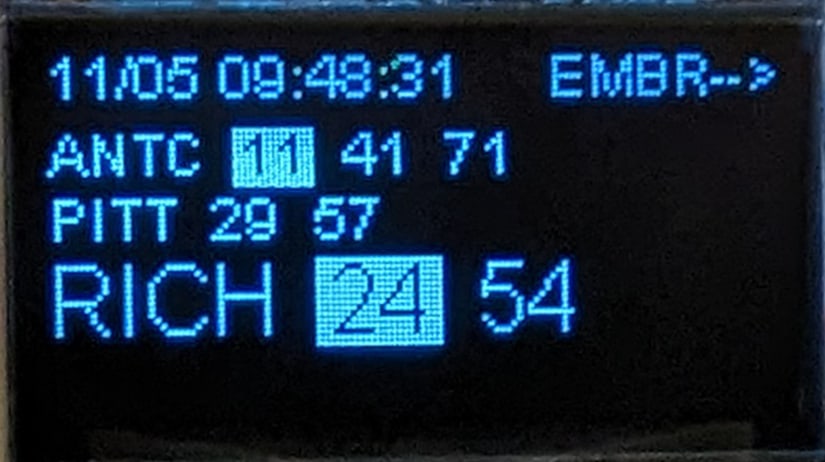
BART-watcher-ESP8266 (early layout)
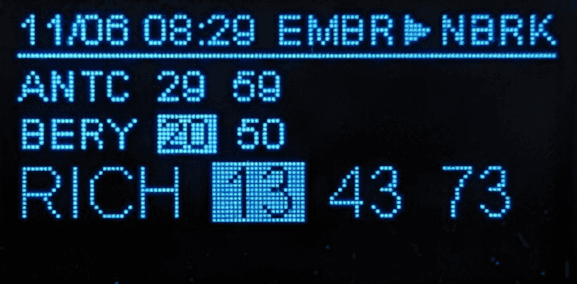
There’s a lot to fit into a 1-inch display, but I got what I needed. The top line shows the date / time the station information was collected, and the departing station. The following lines are trains that are usable for the destination station, with the preferred (direct) lines in large type, and less-preferred (transfer needed) in small type. Finally, if a train is within the sweet spot where it isn’t departing too soon to make it to the station but I also won’t be waiting at the station too long, the departure time is highlighted. Numbers are minutes until departure, “L” means leaving now, and “X” means the trains was cancelled (somewhat frequent these days).
In the example above, these are trains leaving Embarcadero for the North Berkeley station (not shown), Antioch and Pittsburg/Bay Point lines require a transfer, Richmond line is direct.
At some point I would like to use a smaller version of the ESP8266 board and 3D print a case to make it a little nicer sitting on a desk, but then again, there’s almost zero chance I’ll get around to it. If anyone is into 3D printing design and wants to contribute, I’ll give you all of the parts needed.
The code / project details are available on my GitHub page at BART-watcher-ESP8266, feel free to snoop, contribute, or steal whatever is useful to you.
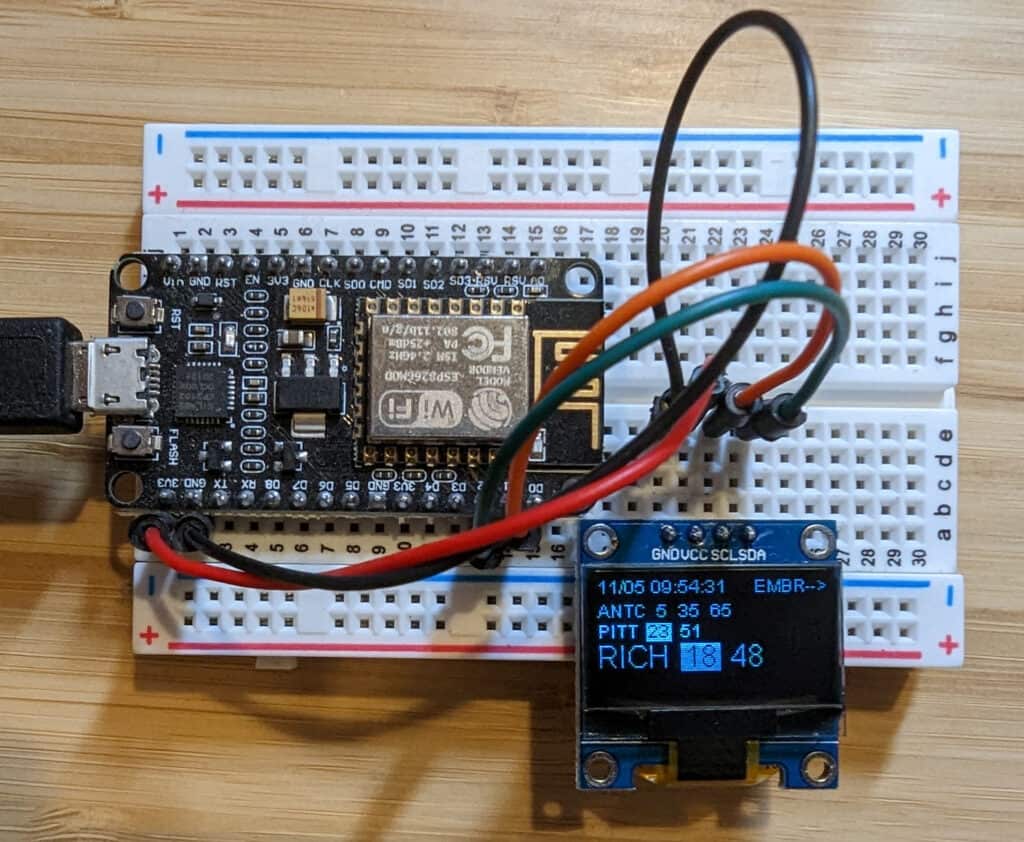
The full build of BART Watcher on ESP8266 and SSD1306 OLED display
Do you have suggestions for features you think would be cool, want to remind me that I waste a lot of time, or maybe you even want one of these things? Please leave a comment, below!
I’ve been incredibly impressed with AI image generation, in how far it has come and how quickly advances are being made. It is one of those things that 5 years ago I would have been pretty confident that it wouldn’t be possible and now there seems to be significant breakthroughs almost weekly. If you don’t know much about AI image generation, hopefully this post will help you understand why it is so impressive and likely to cause huge disruptions in design.
Midjourney AI-generated image, “beautiful woman, frolicking in water, gorgeous blonde woman, beach, detailed eyes”
As a quick background, AI image generation takes a written description and turns it into an image. The AI doesn’t find an image, it creates one based on being trained looking at millions of images and effectively learning patterns that fit the description. The results can be anywhere from photo-realistic to fantasy artwork or classical painting styles… almost anything. There are several projects available for pretty much anyone to try for free, including Midjourney, Stable Diffusion, and DALL-E 2. I am using DiffusionBee that runs from my MacBook, even without a network connection (i.e. it isn’t cheating and pulling images off of the Internet). Oh, and image generation is fast…. from a few seconds to about a minute.
If it isn’t obvious why this is amazing and likely to be massively disruptive, imagine you need a movie poster, blog images, magazine photos, book illustrations, a logo, or anything else that used to require a human to design. The computer is getting pretty good and can generate thousands of options in the time it takes a human to generate one. It can actually be faster to generate a brand new, totally unique image rather that search the web or look through stock photography options. For example, the robot image featured at the top of this posting was generated on Midjourney with about 5 minutes of effort.
As a practical example, recently Sticker Mule had one of their great 50 stickers for $19 deals and I wanted to create a version of the Banksy robot I use for my blog header, but I wanted a new style, something unique to me. However, I am not an artist so coming up with anything that would look good was unlikely. Then I remembered my new friends the robot overlords, and thought I would see if they could help me.
The Banksy robot cleaned up just a little
One of the cool things about AI image generation is you can seed it with an image to help give some structure to the end result. The first thing I did is take the original Banksy robot, remove the background and spray paint from the hand, and fix the feet a bit. This didn’t need to be perfect of even good, as it is just used by the AI for inspiration, for lack of a better word.
I loaded up DiffusionBee, included my robot image and simply asked it to render hundreds of images with the prompt “robot sticker”. And then I ate dinner. When I came back to my computer, I had a large gallery of images that were what I wanted… inspired by the original but all very different. Importantly, they looked like stickers!
If you look through the gallery, above, you can see the robot stickers have similarity in structure to the original, but there is huge variation on many dimensions. In some cases legs are segmented, sometimes solid metal. Heads can be square, round, or even… I’m not sure what shape it is. The drawing style varies from child-like art to abstract. And again, these are all new, unique images created by AI.
The winning robot, headed to Sticker Mule
The biggest challenge I had was trying to pick just one… so many were very cool. I finally decided and it took about another 5 minutes to clean up the image a little to prepare it for stickerification.
When I looked at my contact sheet, my army of robots, it reminded me of my early days developing video games… if I had wanted to make a game where each player gets a unique avatar, it would have taken months to have somebody create these images. Today it takes hours.
I mentioned that things are progressing quickly… in the last few months we’ve gone from decent images to beautiful images to generating HD video from text prompts. It isn’t hard to imagine that, in the not-too-distant future, it will be possible to create a full length feature film from the comfort of your living room, and that the quality will be comparable to modern Hollywood blockbusters. The next Steven Spielberg or Quentin Tarantino won’t be gated by needing $100 million in backing to make their film, the barriers will be significantly smaller. AI has the potential to eliminate some creative professions, but it also has the ability to unlock opportunities for many others.
What are your thoughts? Is AI image generation an empowering technology that will democratize creative expression, a horrible development that will put designers out of work, or do you just welcome our new robot overlords? Leave a comment, below!
If you’ve ever had a free weekend, a desire to create a more secure smart home, and questionable judgment, you’ve come to the right place. In this post I’ll talk about how to take common IoT (Internet of Things) devices and put your own software on them.
Disclaimer: depending on the device, this exercise can range from pretty easy to drink bourbon and slam your head against the desk difficult. Oh, and there is some risk of electrocuting yourself or setting your house on fire. So everything after this point is for entertainment purposes only…
Why Hack Your IoT Devices?
Most people creating a smart home take the easy path… pick out some cheap and popular devices on Amazon, install the smartphone app to configure it, and are good to do. Why would anyone want to got through the extra effort to hack the device? There are a few good reasons:
Security: With few exceptions, most smart devices require installing an app on your phone, often times from an unknown vendor and with questionable device permissions needed. The devices themselves are tiny, wifi-connected computers, and also have software that is updated by connecting to a server in some country, and installing new software on the device connected to your home network. Having a cheap device connected to your home network that requires full access the Internet to work is bad, but it is worse when that software can be changed at any time, to do whatever the person changing it wants it to do. This could turn your light switch into part of a botnet, or worse, be exploited to attack other devices on your home network. By hacking replacing the software, you create a device that works properly without ever needing access to the Internet, lowing the security risk. You can also see (and change) exactly what software the device is using.
Sustainability: Since the devices require communicating with an external company for configuration and updates, when that company stops supporting the device or worse, goes out of business and turns off their servers, your device becomes useless or stuck in its current configuration forever. By hacking replacing the software, you are able to support the device even if the company ceases to exists. And by using open source software with a robust community, you will likely have very long term support.
Because I Can (mu ha ha ha): Okay, this is more of a fun reason, but worth mentioning. I’ve generally been much happier with the hacked versions of my products, whether it be my Tivo, Wii, or car dashboard. Smart light switches are a relatively low-risk hack, as they are inexpensive, and I’m assuming the risk is turning it into a brick, not causing an electrical fire (I’ll update the blog if I have an update on that).
Getting Started
My adventure started with the spontaneous purchase of a Gosund Smart Light Switch. Like a gazillion IoT devices sold by name brand and random manufacturers, this switch is controlled by an ESP8266. Most of these ESP8266 devices use a turnkey software solution made by Tuya, a Chinese company powering thousands of brands from Philips to complete randos.
For security and sustainability reasons, I decided I didn’t want this switch connected to my home network, and even if I wrote complex network firewall rules to limit its access, it would need to connect to the open Internet and other devices in my house to work properly.
I did some research and found Tasmota, an open source project that replaces the software on ESP8266 or ESP8285 devices, eliminating the need for Internet access and enabling functionality that make them easier to connect to controllers like Amazon’s Alexa. The older examples required disassembling the device and soldering to hack it, which is exactly not what I wanted to do. However, more recently there was an OTA (over the air) solution that didn’t require opening a device at all, and did all of the hacking over wifi… that sounded great.
Tasmota Wifi Installation
When I tinker I like to use a computer that I can reset easily so that I don’t have to worry about an odd configuration causing problems later. I have an extra Raspberry Pi that is handy for this, and installed a clean version of the Raspberry Pi Desktop to install on an extra Micro SD card.
I installed TUYA-CONVERT, which basically creates a new wifi network that and forges the DNS (how computers translate a name like tuya.com to numbers that identify a server) to resolve to itself rather than the Tuya servers, so that when the device goes to get a software update from the mothership, it gets the Tasmota software installed instead – hacking complete.
An example of poor judgment, however the red load wire is capped, as that is a not good wire to touch when the switch is on.
I started running the tuya-convert script on my Raspberry Pi and, rather than go through the full process of installing the switch in the wall, I found a standard PC power cable (C13) was the perfect size to hold the wires in place or allow testing on my desk. DO NOT DO THIS – I am showing you only as an example of what a person of questionable judgment might do. The switch powered up and on the tuya-convert console I could see it connecting and trying to get the new software! I love it when things just work.
But then, it didn’t work. While there was a lot of exciting communication happening between Raspberry Pi and the switch, ultimately the install failed. Looking at the logs, I was getting a message “could not establish sslpsk socket“, and found this open issue, New PSK format #483. Apparently, newer versions of the Tuya software require a secret key from the server to do a software update, and without the key (only known by Tuya), no new software will be accepted. So, damn… these newer devices can’t use the simple OTA update. Also, if you have older devices, do not configure them with the app it comes with if you plan on hacking, as that will update them from the OTA-friendly version to requiring the secret key.
Tasmota Serial Cable Installation
I realized I was too far down the rabbit hole to give up, so it was onto the disassembly and soldering option. The Tasmota site has a pretty good overview of how to do this, although I thought a no-solder solution would be possible, and tried to find the path that requires the least effort (yay laziness).
Gosund light switch SW5-V1.2 circuitboard, pen for scale. The connection points are the six dots towards the top, running down the right side (zoom in for labels).
Opening the switch required a Torx T5 screwdriver (tiny, star-shaped tool), and I happened to have one laying around from when I replaced my MacBook Pro battery. Looking at the circuit board, I realized that very tiny labels and contact points, combined with my declining eyesight, made this a challenge. I took a quick photo with my Pixel 4a and zoomed in to see what I needed… the serial connections on the side of the board (look for the tiny RX, TX, GND, and 3.3 labels… no, really, look). While soldering would be the most reliable connection, I was hoping test hook clips would do the job.
Since I was already using a Raspberry Pi, I didn’t need a USB serial adapter, as I could connect the Pi’s GPIO directly to the switch. Again, the Tasmota project has a page giving an example of connecting directly to the Pi. Whatever method you use, it is critical you connect with 3.3V, not 5V, and the higher voltage will likely fry the ESP8266. If you have a meter handy, check and double check the voltage. And, if you’re using the Raspberian OS, you may find /dev/ttyS0 is disabled… you will need to add enable_uart=0 to your /boot/config.txt file and reboot.
I connected the switch directly to the Raspberry Pi. There ware several things annoying about this, starting with each time the switch is connected to the 3.3V, it reboots the Pi. And since almost every command to the switch requires resetting its programming mode through a power cycle, that means rebooting the Pi frequently (fortunately it is a fast boot process).
Test hook clips connecting the Raspberry Pi to the Gosund switch worked surprisingly well.
The good news is, the test hook clips worked, which was a bit of a surprise. I added a connection from Pi ground to switch 00 (green wire in the photo), as that forces the switch to enter into programming mode at boot (it is okay to leave that connected during the hacking process, or you can detach it once it is in programming mode). I made sure everything was precariously balanced to add excitement and more opportunities for failure into the process. I was able to confirm that I entered programming mode and had access to the switch by esptool, a command line utility for accessing ESP82xx devices. Success! 🎉
The bad news is, other than being able to read the very basics from the switch, like the chip type, frequency, and MAC address, pretty much everything else failed. And, each successful access only worked once and then required a reboot. I was unable to upload new software to the switch. After researching a bit, the best clue I had was problems with voltage drops on homemade serial devices, and wiring directly to the Pi circuitboard seemed like it might apply. At this point I needed a drink, and went with a nice IPA.
But hey, once you’re this far down the rabbit hole, why stop? I decided to try a more traditional serial connection, using a CH340G USB to serial board.
Serial Killer Part Two
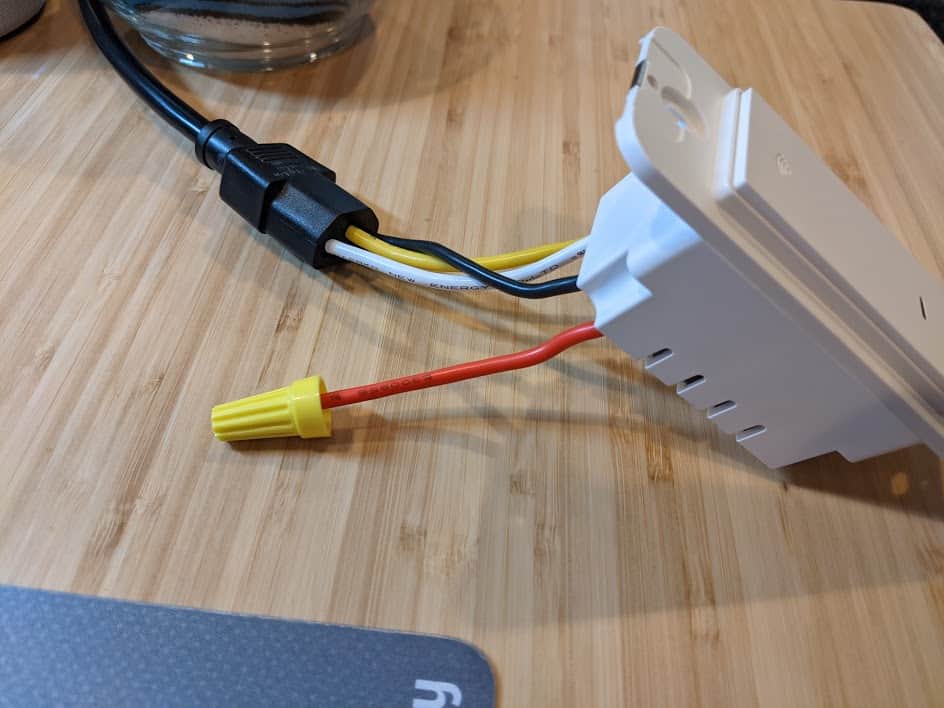
Apparently there was an issue using the Raspberry Pi directly for the serial communication as the USB to serial adapter worked perfectly. I validated the connection using esptool and then used the tasmotizer GUI, which makes it easy to backup, flash, and install new software on the switch. Many steps require rebooting the switch to proceed to the next step, but that is as simple as unplugging the USB cable and plugging it back in (even better that it isn’t triggering a reboot of the Raspberry Pi each time).
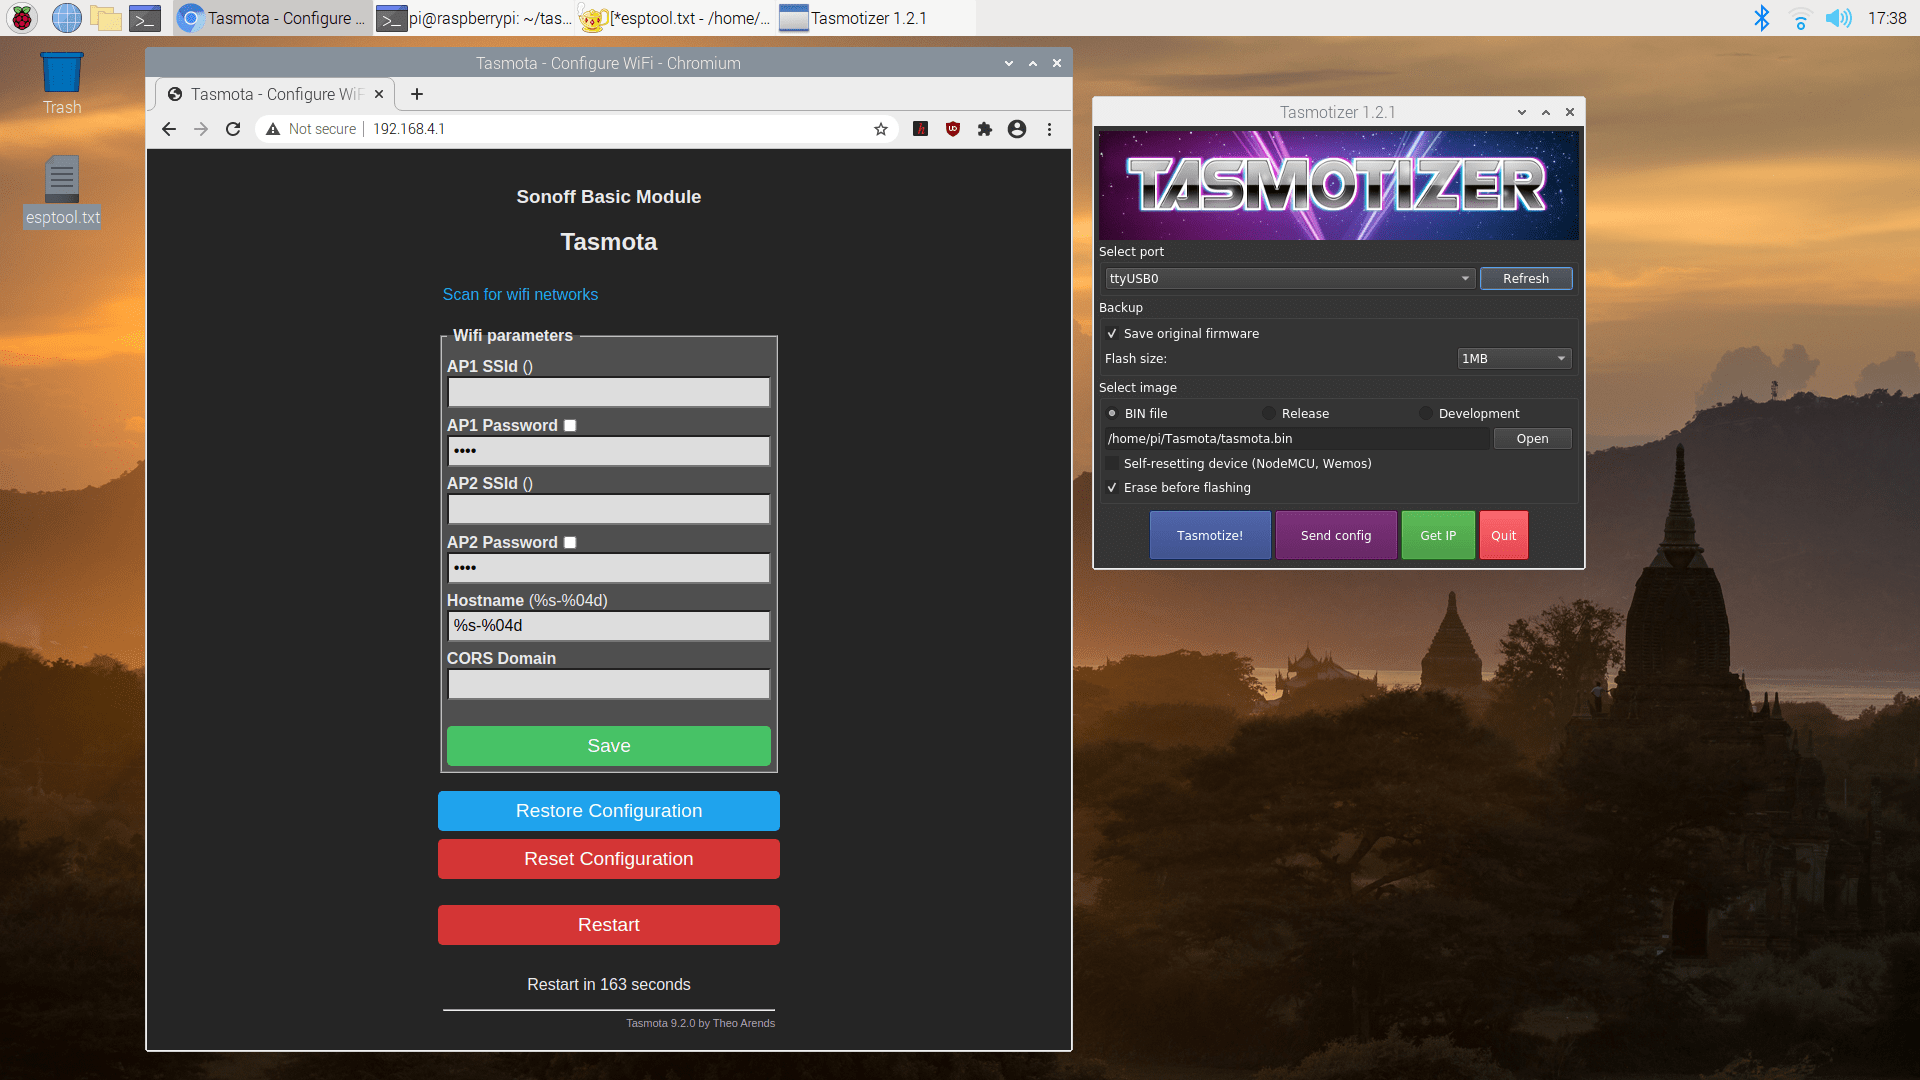
Tasmotizer and the default web interface to configure your newly-hacked switch
Once the new software is installed, there is one final reboot of the switch (don’t forget to disconnect the ground to 00 or else it boots back into programming mode). At this point the switch sets up a wifi network names tasmota[mac] where [mac] is part of the mac address. Connect to this network and point your browser to http://192.168.4.1 and you are able to configure your device. Set AP1 SSId and AP1 Password to your home wifi, click “save”, and a few seconds later your switch will be accessible from your home network.
If you’re curious about attempting this yourself, have questions about my sanity, or have other experiences hacking your smart devices, I’d love to hear from you – please leave a reply below!